CONTENT
ここから
この節で学ぶこと
前回の 4-4 では、Stack を使って、TikTok風アプリの画面配置を作りました。
動画背景の上に、上部ナビゲーション、右側ボタン、下部情報を重ねました。
Stack
├─ 動画背景
├─ 上部ナビ
├─ 右側ボタン
└─ 下部情報
今回の 4-5 では、画面に表示する「動画データ」を設計します。
TikTok風アプリでは、1本の動画にいろいろな情報があります。
動画URL
ユーザー名
キャプション
音源名
いいね数
コメント数
保存数
共有数
プロフィール色
カテゴリ
これらをバラバラの変数で持つと、動画が増えたときに管理が大変になります。
そこで、動画1本分の情報を ShortVideo というclassにまとめます。
この節で大切なのは、次の一文です。
classは、画面に表示するデータを整理するための設計図である。
まず「データ」とは何か
アプリの画面には、文字や数字、画像、動画などが表示されます。
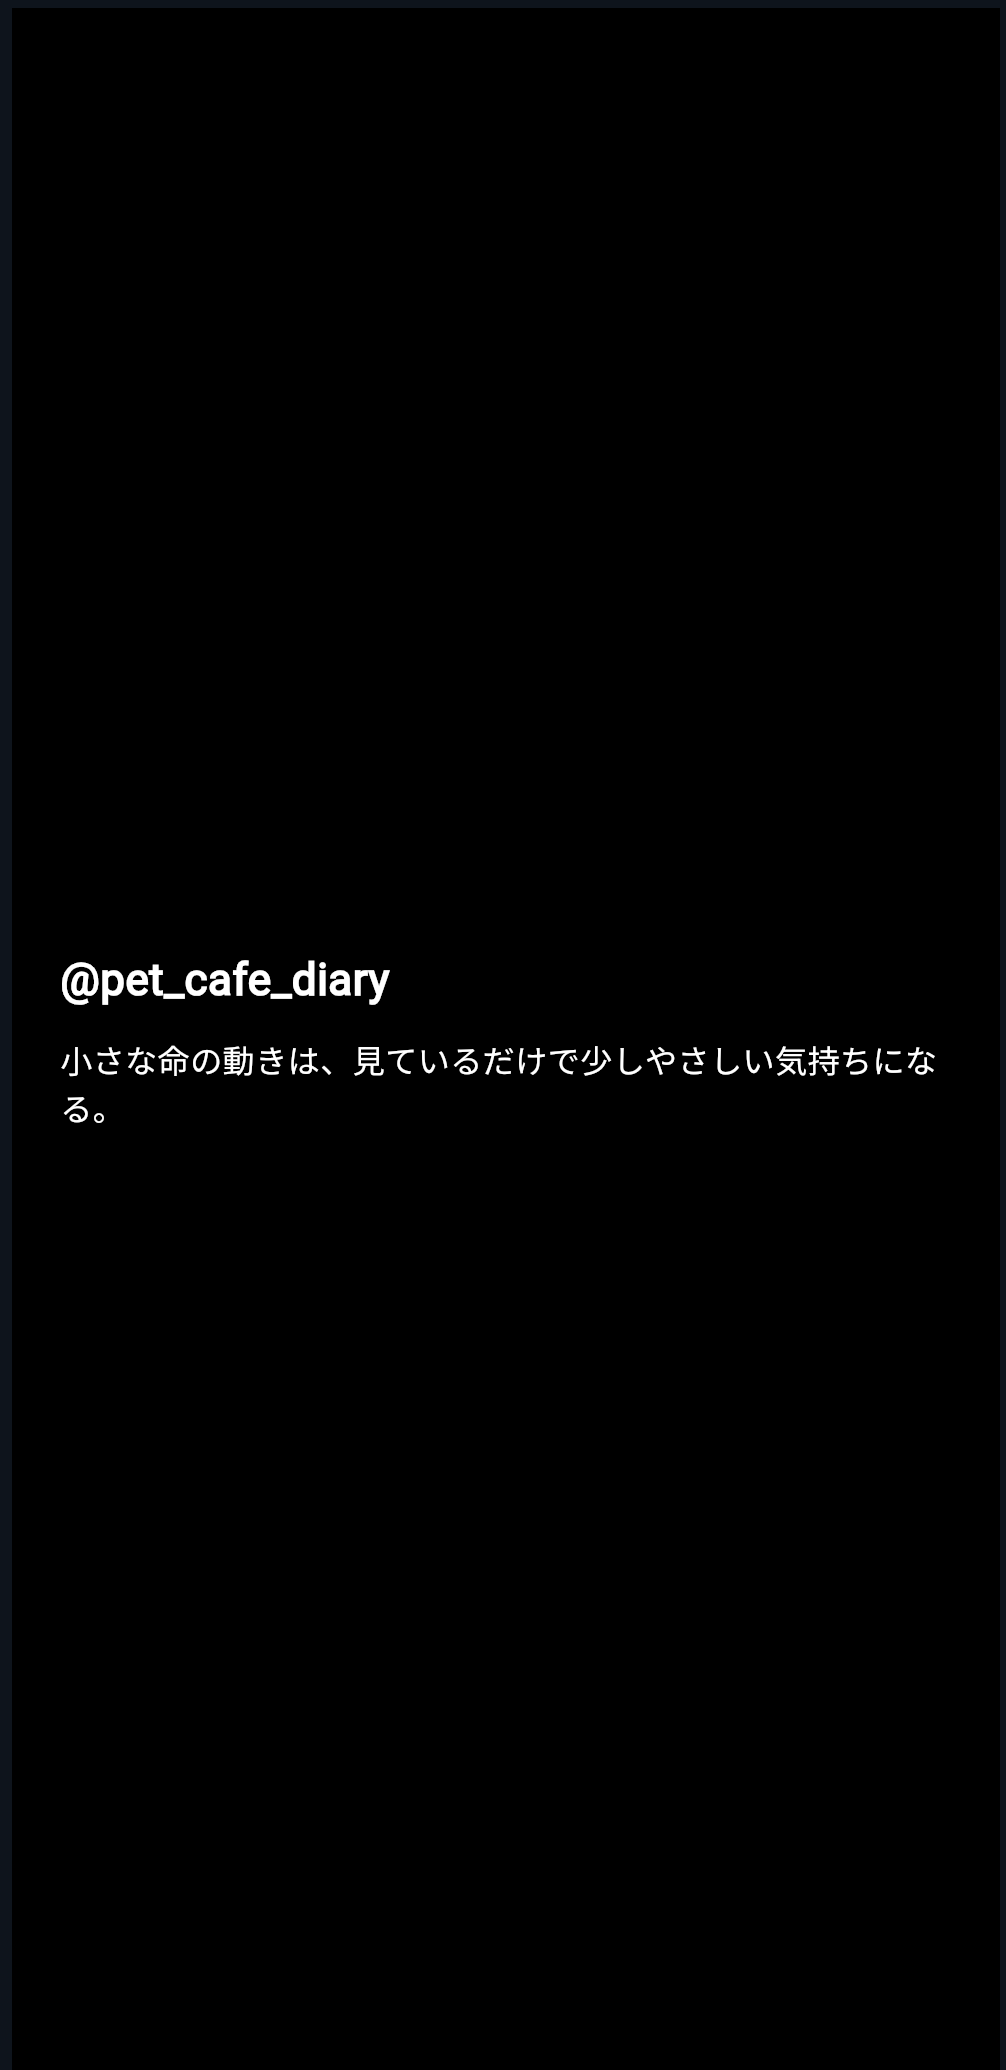
たとえば、TikTok風アプリの下部には、次のような情報が表示されます。
@pet_cafe_diary

小さな命の動きは、見ているだけで少しやさしい気持ちになる。

PET ♪ Healing Cafe Sound - Pet Cafe Diary
右側には、次のような数字が表示されます。
いいね数:1.3万
コメント数:324
保存数:1.2K
共有数:856
これらの表示は、最初から画面に直接書かれているわけではありません。
裏側に、表示の元になる情報があります。
それがデータです。
データ
↓
Widgetに渡す
↓
画面に表示される
初心者向けには、次のように理解してください。
データ = 画面に表示する情報の材料
TikTok風アプリで必要なデータ
今回作るTikTok風アプリでは、動画1本ごとに次の情報を持たせます。
| 情報 | 例 | 画面で使う場所 |
|---|---|---|
| 動画URL | butterfly.mp4 | 背景動画 |
| ユーザー名 | pet_cafe_diary | 下部の投稿者名 |
| キャプション | 小さな命の動きは... | 下部の説明文 |
| 音源名 | Healing Cafe Sound... | 下部の音源表示 |
| いいね数 | 12800 | 右側のハート下 |
| コメント数 | 324 | 右側のコメント下 |
| 保存数 | 1204 | 右側の保存下 |
| 共有数 | 856 | 右側の共有下 |
| アバター色 | Colors.pink | プロフィールアイコン |
| カテゴリ | PET | 下部のラベル |
これらの情報を、動画1本分としてまとめます。
もしバラバラの変数で持つとどうなるか
まず、classを使わずに、バラバラの変数で動画情報を持つ例を見てみます。
final videoUrl = 'https://flutter.github.io/assets-for-api-docs/assets/videos/butterfly.mp4';
final userName = 'pet_cafe_diary';
final caption = '小さな命の動きは、見ているだけで少しやさしい気持ちになる。';
final musicTitle = 'Healing Cafe Sound - Pet Cafe Diary';
final likes = 12800;
final comments = 324;
動画が1本だけなら、これでも分かります。
しかし、動画が2本、3本と増えるとどうなるでしょうか。
final videoUrl1 = '...';
final userName1 = 'pet_cafe_diary';
final caption1 = '...';

final videoUrl2 = '...';
final userName2 = 'food_and_nature';
final caption2 = '...';

final videoUrl3 = '...';
final userName3 = 'daily_pet_room';
final caption3 = '...';
だんだん分かりにくくなります。
どのuserNameがどの動画のものか分かりにくい
動画が増えるほど変数が増える
いいね数やコメント数も管理しづらい
そこで、動画1本分の情報を ShortVideo というclassにまとめます。
新しい言葉:classとは何か
class は、データの設計図です。
初心者向けには、次のように理解してください。
class = 同じ形のデータを作るための設計図
たとえば、動画1本分には、毎回同じような情報があります。
動画URL
ユーザー名
キャプション
いいね数
コメント数
保存数
共有数
この「動画1本分の形」をclassとして作ります。
class ShortVideo {
  const ShortVideo({
    required this.videoUrl,
    required this.userName,
    required this.caption,
  });

  final String videoUrl;
  final String userName;
  final String caption;
}
この ShortVideo classがあれば、動画1本分の情報をまとめて作れます。
新しい言葉:propertyとは何か
classの中にある情報のことを、property と呼びます。
final String videoUrl;
final String userName;
final String caption;
これらがpropertyです。
初心者向けには、次のように理解してください。
property = classが持っている情報
ShortVideo のpropertyは、動画1本分の持ち物です。
| property | 意味 |
|---|---|
videoUrl | 動画のURL |
userName | 投稿者のユーザー名 |
caption | 動画の説明文 |
musicTitle | 音源名 |
likes | いいね数 |
comments | コメント数 |
saves | 保存数 |
shares | 共有数 |
avatarColor | アイコン色 |
categoryLabel | カテゴリ表示 |
新しい言葉:constructorとは何か
classから実際のデータを作る入口を、constructor と呼びます。
const ShortVideo({
  required this.videoUrl,
  required this.userName,
  required this.caption,
});
初心者向けには、次のように理解してください。
constructor = classからデータを作るときの入口
たとえば、次のように ShortVideo データを作ります。
const video = ShortVideo(
  videoUrl: 'https://flutter.github.io/assets-for-api-docs/assets/videos/butterfly.mp4',
  userName: 'pet_cafe_diary',
  caption: '小さな命の動きは、見ているだけで少しやさしい気持ちになる。',
);
これは、次の意味です。
ShortVideoという設計図を使って、
動画1本分のデータを作る。
新しい言葉:requiredとは何か
constructorの中に、required という言葉が出てきます。
required this.videoUrl,
required this.userName,
required this.caption,
required は、「この値は必ず渡してください」という意味です。
つまり、ShortVideo を作るときには、videoUrl、userName、caption を必ず書く必要があります。
const video = ShortVideo(
  videoUrl: '...',
  userName: 'pet_cafe_diary',
  caption: '...',
);
もし userName を書き忘れると、エラーになります。
初心者向けには、次のように覚えてください。
required = このデータを作るために必ず必要な項目
新しい言葉:finalとは何か
classのpropertyには、final がついています。
final String videoUrl;
final String userName;
final String caption;
final は、一度値を入れたらあとから変更しない、という意味です。
TikTok風アプリのサンプル動画データでは、ユーザー名やキャプションは最初に決めたら、その場で勝手に変わる必要はありません。
そのため、final を使います。
初心者向けには、次のように理解してください。
final = あとから変えない値
まずは小さなShortVideo classを作る
いきなり完成形のclassを書くと、少し長く感じます。
まずは、動画URL、ユーザー名、キャプションだけを持つ小さなclassから始めます。
DartPadに次のコードを貼り付けてください。
import 'package:flutter/material.dart';

void main() {
  const video = ShortVideo(
    videoUrl: 'https://flutter.github.io/assets-for-api-docs/assets/videos/butterfly.mp4',
    userName: 'pet_cafe_diary',
    caption: '小さな命の動きは、見ているだけで少しやさしい気持ちになる。',
  );

  print(video.videoUrl);
  print(video.userName);
  print(video.caption);
}

class ShortVideo {
  const ShortVideo({
    required this.videoUrl,
    required this.userName,
    required this.caption,
  });

  final String videoUrl;
  final String userName;
  final String caption;
}
実行結果
実行すると、Consoleに次のように表示されます。
https://flutter.github.io/assets-for-api-docs/assets/videos/butterfly.mp4
pet_cafe_diary
小さな命の動きは、見ているだけで少しやさしい気持ちになる。
このコードでは、まだ画面を作っていません。
まず、ShortVideo というclassで動画データを作り、そこから値を取り出して確認しています。
video.userName の読み方
次のコードを見てください。
print(video.userName);
これは、次のように読みます。
videoの中にあるuserNameを取り出す
video は、ShortVideo classから作った動画データです。
その中に、userName というpropertyがあります。
video
├─ videoUrl
├─ userName
└─ caption
そのため、video.userName と書くと、ユーザー名を取り出せます。
画面に表示してみる
次に、作った動画データをFlutterの画面に表示してみます。
DartPadに次のコードを貼り付けてください。
import 'package:flutter/material.dart';

void main() {
  runApp(const ShortVideoDataApp());
}

class ShortVideoDataApp extends StatelessWidget {
  const ShortVideoDataApp({super.key});

  @override
  Widget build(BuildContext context) {
    const video = ShortVideo(
      videoUrl: 'https://flutter.github.io/assets-for-api-docs/assets/videos/butterfly.mp4',
      userName: 'pet_cafe_diary',
      caption: '小さな命の動きは、見ているだけで少しやさしい気持ちになる。',
    );

    return const MaterialApp(
      debugShowCheckedModeBanner: false,
      home: ShortVideoDataPage(
        video: video,
      ),
    );
  }
}

class ShortVideoDataPage extends StatelessWidget {
  const ShortVideoDataPage({
    super.key,
    required this.video,
  });

  final ShortVideo video;

  @override
  Widget build(BuildContext context) {
    return Scaffold(
      backgroundColor: Colors.black,
      body: Center(
        child: Padding(
          padding: const EdgeInsets.all(24),
          child: Column(
            mainAxisSize: MainAxisSize.min,
            crossAxisAlignment: CrossAxisAlignment.start,
            children: [
              Text(
                '@${video.userName}',
                style: const TextStyle(
                  color: Colors.white,
                  fontSize: 22,
                  fontWeight: FontWeight.bold,
                ),
              ),
              const SizedBox(height: 12),
              Text(
                video.caption,
                style: const TextStyle(
                  color: Colors.white,
                  fontSize: 16,
                  height: 1.5,
                ),
              ),
            ],
          ),
        ),
      ),
    );
  }
}

class ShortVideo {
  const ShortVideo({
    required this.videoUrl,
    required this.userName,
    required this.caption,
  });

  final String videoUrl;
  final String userName;
  final String caption;
}
ここで起きていること
このコードでは、ShortVideo データを作り、それを画面に渡しています。
const video = ShortVideo(
  videoUrl: 'https://flutter.github.io/assets-for-api-docs/assets/videos/butterfly.mp4',
  userName: 'pet_cafe_diary',
  caption: '小さな命の動きは、見ているだけで少しやさしい気持ちになる。',
);
そして、ShortVideoDataPage に渡しています。
home: ShortVideoDataPage(
  video: video,
),
ShortVideoDataPage は、受け取った video を使って画面に表示します。
Text('@${video.userName}')
Text(video.caption)
この流れがとても大切です。
データを作る
↓
Widgetに渡す
↓
Widgetが表示する
Widgetにデータを渡すとは何か
次のコードを見てください。
class ShortVideoDataPage extends StatelessWidget {
  const ShortVideoDataPage({
    super.key,
    required this.video,
  });

  final ShortVideo video;
ここでは、ShortVideoDataPage が ShortVideo データを受け取れるようにしています。
final ShortVideo video; は、次の意味です。
このWidgetは、ShortVideo型のvideoを持つ
そして、constructorで受け取ります。
required this.video,
これにより、外から次のようにデータを渡せます。
ShortVideoDataPage(
  video: video,
)
この仕組みは、これから何度も使います。
最終的なアプリでは、動画1本分のデータを ShortVideoPage に渡します。
ShortVideoPage(
  video: videos[videoIndex],
)
表示用の情報を増やす
ここまでの ShortVideo classには、3つのpropertyしかありません。
final String videoUrl;
final String userName;
final String caption;
しかし、TikTok風アプリを作るには、もっと情報が必要です。
たとえば、いいね数やコメント数です。
final int likes;
final int comments;
保存数や共有数も必要です。
final int saves;
final int shares;
音源名も必要です。
final String musicTitle;
カテゴリラベルも必要です。
final String categoryLabel;
プロフィールアイコンの色も持たせたいです。
final Color avatarColor;
最終的には、次のようなclassになります。
class ShortVideo {
  const ShortVideo({
    required this.videoUrl,
    required this.userName,
    required this.caption,
    required this.musicTitle,
    required this.likes,
    required this.comments,
    required this.saves,
    required this.shares,
    required this.avatarColor,
    required this.categoryLabel,
  });

  final String videoUrl;
  final String userName;
  final String caption;
  final String musicTitle;
  final int likes;
  final int comments;
  final int saves;
  final int shares;
  final Color avatarColor;
  final String categoryLabel;
}
型を整理する
ShortVideo classのpropertyには、それぞれ型があります。
| property | 型 | 意味 |
|---|---|---|
videoUrl | String | 動画URL |
userName | String | ユーザー名 |
caption | String | 説明文 |
musicTitle | String | 音源名 |
likes | int | いいね数 |
comments | int | コメント数 |
saves | int | 保存数 |
shares | int | 共有数 |
avatarColor | Color | アイコン色 |
categoryLabel | String | カテゴリ名 |
ここで出てくる型を確認します。
String
String は文字列です。
final String userName;
ユーザー名やキャプション、音源名のような文字情報に使います。
int
int は整数です。
final int likes;
いいね数、コメント数、保存数、共有数のような数字に使います。
Color
Color は色です。
final Color avatarColor;
プロフィールアイコンの背景色などに使います。
完成形に近いデータを作る
次に、完成形に近い ShortVideo データを作ってみます。
const video = ShortVideo(
  videoUrl: 'https://flutter.github.io/assets-for-api-docs/assets/videos/butterfly.mp4',
  userName: 'pet_cafe_diary',
  caption: '小さな命の動きは、見ているだけで少しやさしい気持ちになる。今日はペットカフェ風の癒し動画。',
  musicTitle: 'Healing Cafe Sound - Pet Cafe Diary',
  likes: 12800,
  comments: 324,
  saves: 1204,
  shares: 856,
  avatarColor: Color(0xFFE91E63),
  categoryLabel: 'PET',
);
この1つの video に、動画1本分の情報がまとまっています。
video
├─ videoUrl
├─ userName
├─ caption
├─ musicTitle
├─ likes
├─ comments
├─ saves
├─ shares
├─ avatarColor
└─ categoryLabel
画面に複数の情報を表示する
次に、完成形に近い ShortVideo classを使って、画面に情報を表示してみます。
DartPadに次のコードを貼り付けてください。
import 'package:flutter/material.dart';

void main() {
  runApp(const ShortVideoDataApp());
}

class ShortVideoDataApp extends StatelessWidget {
  const ShortVideoDataApp({super.key});

  @override
  Widget build(BuildContext context) {
    const video = ShortVideo(
      videoUrl: 'https://flutter.github.io/assets-for-api-docs/assets/videos/butterfly.mp4',
      userName: 'pet_cafe_diary',
      caption: '小さな命の動きは、見ているだけで少しやさしい気持ちになる。今日はペットカフェ風の癒し動画。',
      musicTitle: 'Healing Cafe Sound - Pet Cafe Diary',
      likes: 12800,
      comments: 324,
      saves: 1204,
      shares: 856,
      avatarColor: Color(0xFFE91E63),
      categoryLabel: 'PET',
    );

    return const MaterialApp(
      debugShowCheckedModeBanner: false,
      home: ShortVideoDataPage(
        video: video,
      ),
    );
  }
}

class ShortVideoDataPage extends StatelessWidget {
  const ShortVideoDataPage({
    super.key,
    required this.video,
  });

  final ShortVideo video;

  @override
  Widget build(BuildContext context) {
    return Scaffold(
      backgroundColor: Colors.black,
      body: Center(
        child: Padding(
          padding: const EdgeInsets.all(24),
          child: Container(
            padding: const EdgeInsets.all(20),
            decoration: BoxDecoration(
              color: Colors.white.withOpacity(0.08),
              borderRadius: BorderRadius.circular(24),
              border: Border.all(
                color: Colors.white.withOpacity(0.16),
              ),
            ),
            child: Column(
              mainAxisSize: MainAxisSize.min,
              crossAxisAlignment: CrossAxisAlignment.start,
              children: [
                CircleAvatar(
                  radius: 24,
                  backgroundColor: video.avatarColor,
                  child: const Icon(
                    Icons.person_rounded,
                    color: Colors.white,
                  ),
                ),
                const SizedBox(height: 14),
                Text(
                  '@${video.userName}',
                  style: const TextStyle(
                    color: Colors.white,
                    fontSize: 22,
                    fontWeight: FontWeight.bold,
                  ),
                ),
                const SizedBox(height: 10),
                Text(
                  video.caption,
                  style: const TextStyle(
                    color: Colors.white,
                    fontSize: 15,
                    height: 1.5,
                  ),
                ),
                const SizedBox(height: 14),
                Text(
                  '${video.categoryLabel} ♪ ${video.musicTitle}',
                  style: const TextStyle(
                    color: Colors.white70,
                    fontSize: 13,
                  ),
                ),
                const SizedBox(height: 18),
                Row(
                  mainAxisAlignment: MainAxisAlignment.spaceBetween,
                  children: [
                    VideoStat(
                      icon: Icons.favorite_rounded,
                      label: video.likes.toString(),
                    ),
                    VideoStat(
                      icon: Icons.mode_comment_rounded,
                      label: video.comments.toString(),
                    ),
                    VideoStat(
                      icon: Icons.bookmark_rounded,
                      label: video.saves.toString(),
                    ),
                    VideoStat(
                      icon: Icons.reply_rounded,
                      label: video.shares.toString(),
                    ),
                  ],
                ),
              ],
            ),
          ),
        ),
      ),
    );
  }
}

class VideoStat extends StatelessWidget {
  const VideoStat({
    super.key,
    required this.icon,
    required this.label,
  });

  final IconData icon;
  final String label;

  @override
  Widget build(BuildContext context) {
    return Column(
      children: [
        Icon(
          icon,
          color: Colors.white,
          size: 26,
        ),
        const SizedBox(height: 4),
        Text(
          label,
          style: const TextStyle(
            color: Colors.white,
            fontSize: 12,
            fontWeight: FontWeight.bold,
          ),
        ),
      ],
    );
  }
}

class ShortVideo {
  const ShortVideo({
    required this.videoUrl,
    required this.userName,
    required this.caption,
    required this.musicTitle,
    required this.likes,
    required this.comments,
    required this.saves,
    required this.shares,
    required this.avatarColor,
    required this.categoryLabel,
  });

  final String videoUrl;
  final String userName;
  final String caption;
  final String musicTitle;
  final int likes;
  final int comments;
  final int saves;
  final int shares;
  final Color avatarColor;
  final String categoryLabel;
}
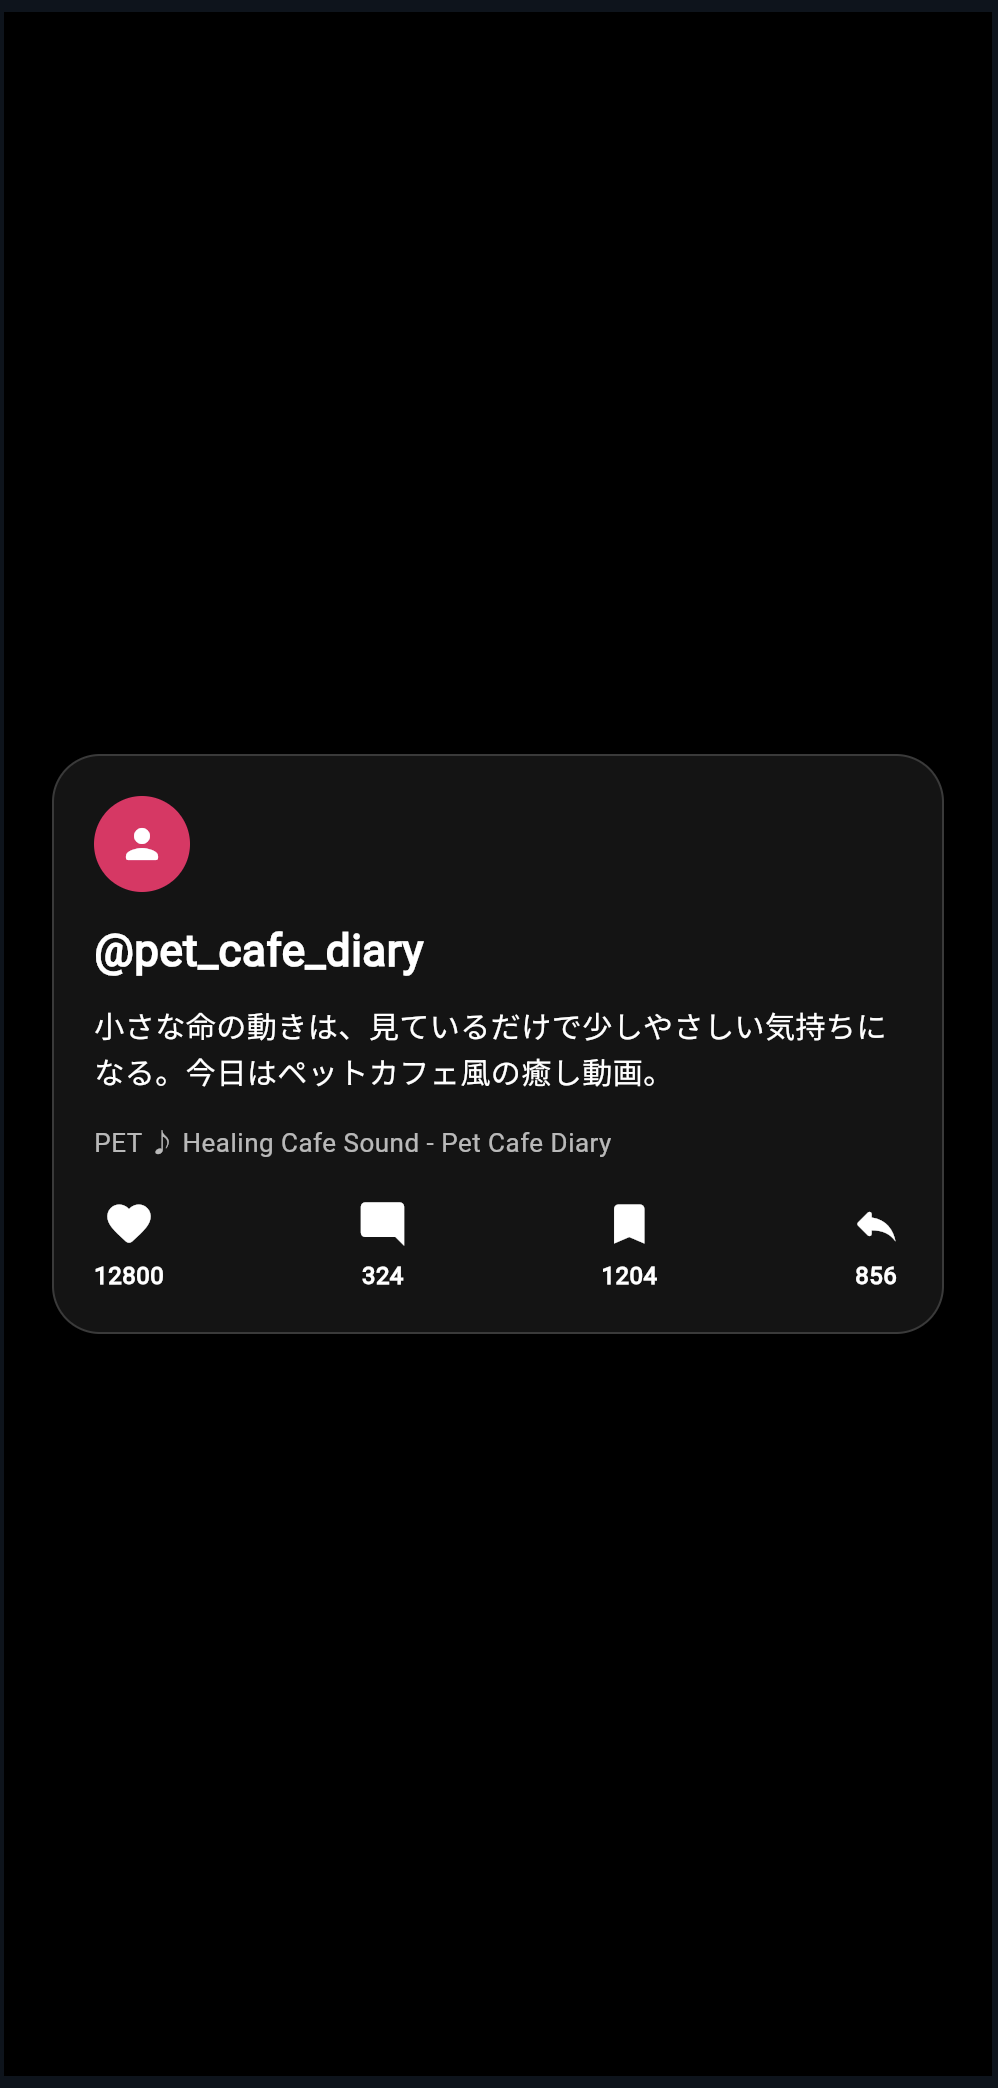
実行して確認すること
このコードを実行すると、黒背景の中央に、動画情報カードのようなUIが表示されます。
表示される情報は、すべて ShortVideo データから取り出しています。
video.userName
video.caption
video.musicTitle
video.likes
video.comments
video.saves
video.shares
video.avatarColor
video.categoryLabel
ここで重要なのは、文字を直接固定で書いているのではなく、データから表示していることです。
ShortVideoデータ
↓
ShortVideoDataPage
↓
TextやIconで表示
数字を表示用に整える
現在のコードでは、いいね数がそのまま表示されます。
12800
しかし、TikTok風アプリでは、次のように短く表示したいです。
1.3万
そこで、数字を表示用に変換する関数を作ります。
String formatCount(int value) {
  if (value >= 10000) {
    final result = value / 10000;
    return '${result.toStringAsFixed(1)}万';
  }

  if (value >= 1000) {
    final result = value / 1000;
    return '${result.toStringAsFixed(1)}K';
  }

  return value.toString();
}
この関数は、数字を見やすい文字に変換します。
| 元の数字 | 表示 |
|---|---|
12800 | 1.3万 |
1204 | 1.2K |
856 | 856 |
新しい言葉:関数とは何か
formatCount は関数です。
関数とは、ある処理に名前をつけたものです。
String formatCount(int value) {
  ...
}
これは、次のように読めます。
int型のvalueを受け取り、
String型の文字を返すformatCountという処理
たとえば、次のように使います。
formatCount(video.likes)
video.likes が 12800 なら、結果は 1.3万 になります。
formatCountを使って表示する
先ほどの VideoStat に渡していた部分を変更します。
変更前です。
VideoStat(
  icon: Icons.favorite_rounded,
  label: video.likes.toString(),
),
変更後です。
VideoStat(
  icon: Icons.favorite_rounded,
  label: formatCount(video.likes),
),
こうすると、12800 が 1.3万 と表示されます。
複数の動画データをListで持つ
TikTok風アプリでは、動画が1本だけではありません。
複数の動画が縦に並びます。
そのため、ShortVideo を List に入れます。
const videos = [
  ShortVideo(
    videoUrl: 'https://flutter.github.io/assets-for-api-docs/assets/videos/butterfly.mp4',
    userName: 'pet_cafe_diary',
    caption: '小さな命の動きは、見ているだけで少しやさしい気持ちになる。',
    musicTitle: 'Healing Cafe Sound - Pet Cafe Diary',
    likes: 12800,
    comments: 324,
    saves: 1204,
    shares: 856,
    avatarColor: Color(0xFFE91E63),
    categoryLabel: 'PET',
  ),
  ShortVideo(
    videoUrl: 'https://flutter.github.io/assets-for-api-docs/assets/videos/bee.mp4',
    userName: 'food_and_nature',
    caption: 'おいしいものを探す旅の途中で出会った、自然の小さなリズム。',
    musicTitle: 'Kitchen Walk - Food & Nature',
    likes: 8732,
    comments: 128,
    saves: 902,
    shares: 411,
    avatarColor: Color(0xFF2196F3),
    categoryLabel: 'FOOD',
  ),
];
この videos は、動画一覧の元データです。
List<ShortVideo>
├─ ShortVideo 1本目
├─ ShortVideo 2本目
└─ ShortVideo 3本目
Listとは何か
List は、複数のデータを順番に持つためのものです。
初心者向けには、次のように理解してください。
List = データを順番に並べたもの
今回の場合は、ShortVideo が複数入ったListです。
const videos = [
  ShortVideo(...),
  ShortVideo(...),
  ShortVideo(...),
];
動画一覧アプリでは、このListを使って、動画を1本ずつ表示します。
Listから1本取り出す
Listの中から1本目の動画を取り出すには、次のように書きます。
videos[0]
2本目は、次のように書きます。
videos[1]
Listの番号は、0から始まります。
| 書き方 | 意味 |
|---|---|
videos[0] | 1本目の動画 |
videos[1] | 2本目の動画 |
videos[2] | 3本目の動画 |
TikTok風アプリでは、後の節で PageView.builder を使い、動画を1本ずつ取り出して表示します。
最終アプリとのつながり
最終的なTikTok風アプリでは、次のような流れになります。
ShortVideo class
↓
const videos = [...]
↓
PageView.builder
↓
ShortVideoPage(video: videos[videoIndex])
↓
画面に表示
今回の節で作っているのは、この最初の部分です。
ShortVideo class
↓
const videos = [...]
つまり、まだ動画再生や縦スクロールは作っていません。
でも、画面に表示する情報の土台はここで作っています。
手を動かす練習1:ユーザー名を変える
次の部分を探してください。
userName: 'pet_cafe_diary',
これを次のように変えてみてください。
userName: 'food_trip_japan',
画面に表示されるユーザー名が変わります。
この練習で、userName が画面表示に使われていることを確認できます。
手を動かす練習2:いいね数を変える
次の部分を探してください。
likes: 12800,
これを次のように変えてみてください。
likes: 35000,
その後、formatCount(video.likes) を使っていれば、3.5万 のように表示されます。
手を動かす練習3:カテゴリを変える
次の部分を探してください。
categoryLabel: 'PET',
これを次のように変えてみてください。
categoryLabel: 'FOOD',
表示されるカテゴリが変わります。
手を動かす練習4:動画をもう1本追加する
videos の中に、新しい ShortVideo を追加してみましょう。
ShortVideo(
  videoUrl: 'https://flutter.github.io/assets-for-api-docs/assets/videos/bee.mp4',
  userName: 'sweet_table',
  caption: '甘いものを囲む時間は、少しだけ日常をやわらかくしてくれる。',
  musicTitle: 'Sweet Table Sound',
  likes: 5400,
  comments: 88,
  saves: 420,
  shares: 120,
  avatarColor: Color(0xFFFF9800),
  categoryLabel: 'SWEETS',
),
今の画面では、まだ1本目しか表示しません。
しかし、後の節で縦スクロールにすると、追加した動画も表示できるようになります。
よくあるつまずき1:classを書いたのに画面が変わらない
class は、設計図です。
classを書いただけでは、画面には表示されません。
実際にデータを作り、Widgetに渡す必要があります。
const video = ShortVideo(...);
そして、画面で使います。
Text(video.userName)
流れは次の通りです。
classを書く
↓
データを作る
↓
Widgetで表示する
よくあるつまずき2:Stringとintを間違える
userName は文字なので、String です。
final String userName;
likes は数字なので、int です。
final int likes;
次のように書くと間違いです。
likes: '12800',
'12800' は文字です。
likes は int なので、正しくは次のように書きます。
likes: 12800,
文字にはクォーテーションをつけます。
数字にはつけません。
よくあるつまずき3:requiredの項目を書き忘れる
constructorで required がついているpropertyは、必ず渡す必要があります。
const ShortVideo({
  required this.videoUrl,
  required this.userName,
  required this.caption,
});
この場合、videoUrl、userName、caption を書き忘れるとエラーになります。
required は、「このデータを作るために必ず必要」という印です。
よくあるつまずき4:Listのカンマを書き忘れる
Listの中に複数の ShortVideo を入れるときは、データ同士をカンマで区切ります。
const videos = [
  ShortVideo(...),
  ShortVideo(...),
  ShortVideo(...),
];
カンマを書き忘れると、エラーになります。
Flutterでは、最後の項目にもカンマをつけることがよくあります。
ShortVideo(
  ...
),
最後のカンマをつけると、コードが自動整形されやすくなります。
この節の確認問題
確認問題1
データとは何ですか。
答え
画面に表示する情報の元になるものです。
ユーザー名、キャプション、いいね数、動画URLなどがデータです。
確認問題2
classとは何ですか。
答え
同じ形のデータを作るための設計図です。
今回の場合、ShortVideo classは動画1本分のデータを作る設計図です。
確認問題3
propertyとは何ですか。
答え
classが持っている情報です。
videoUrl、userName、caption、likes などがpropertyです。
確認問題4
constructorとは何ですか。
答え
classから実際のデータを作る入口です。
ShortVideo(...) のように使います。
確認問題5
required は何を意味しますか。
答え
その値を必ず渡す必要があるという意味です。
確認問題6
List<ShortVideo> は何を表しますか。
答え
複数の動画データを順番に持つ一覧です。
TikTok風アプリでは、縦スクロールで表示する動画一覧の元データになります。
この節のまとめ
この節では、TikTok風アプリで使う動画データを ShortVideo classとして設計しました。
TikTok風アプリには、動画URL、ユーザー名、キャプション、音源名、いいね数、コメント数、保存数、共有数など、たくさんの情報があります。
それらをバラバラに持つのではなく、動画1本分の情報としてまとめることで、扱いやすくなります。
class ShortVideo {
  const ShortVideo({
    required this.videoUrl,
    required this.userName,
    required this.caption,
    required this.musicTitle,
    required this.likes,
    required this.comments,
    required this.saves,
    required this.shares,
    required this.avatarColor,
    required this.categoryLabel,
  });

  final String videoUrl;
  final String userName;
  final String caption;
  final String musicTitle;
  final int likes;
  final int comments;
  final int saves;
  final int shares;
  final Color avatarColor;
  final String categoryLabel;
}
このclassを使って、複数の動画を List<ShortVideo> として持てます。
const videos = [
  ShortVideo(...),
  ShortVideo(...),
  ShortVideo(...),
];
この節で一番大切なのは、次の一文です。
画面に表示する情報は、classでデータとして整理してからWidgetに渡す。
次の節では、video_player を使って、この動画データの videoUrl から実際に動画を再生していきます。