CONTENT
ここから
この節で学ぶこと
前回の 4-10 では、いいね・保存・共有ボタンを押したときに、状態を変える方法を学びました。
いいねを押す
↓
ハートに色がつく
↓
数字が増える
今回の 4-11 では、コメントボタンを押したときに、画面の下からコメント入力画面を表示します。
TikTok風アプリでは、コメントボタンを押すと、画面下からコメント欄が出てきます。
コメントボタンを押す
↓
下からコメント欄が表示される
↓
コメント一覧が見える
↓
入力欄にコメントを書ける
↓
送信するとコメントが追加される
Flutterでは、このような「下から出てくる画面」を BottomSheet で作れます。
この節で大切なのは、次の一文です。
BottomSheetを使うと、現在の画面の上に、下から出てくる追加画面を表示できる。
まずBottomSheetとは何か
BottomSheet は、画面の下から出てくるパネルのようなUIです。
初心者向けには、次のように理解してください。
BottomSheet = 画面下から出てくる一時的な表示エリア
たとえば、TikTok風アプリでは、コメント欄に使えます。
動画画面
└─ コメントボタンを押す
   └─ 下からコメント欄が出る
画面全体を別ページに移動するのではなく、今見ている動画の上に重ねて表示するイメージです。
TikTok風コメント欄を分解する
TikTok風のコメント欄は、次のような部品でできています。
CommentSheet
├─ 上部のつまみ
├─ コメント件数
├─ 閉じるボタン
├─ コメント一覧
│  └─ CommentTile
└─ コメント入力欄
   └─ CommentInputBar
それぞれの役割は、次の通りです。
| 部品 | 役割 |
|---|---|
CommentSheet | コメント欄全体 |
| つまみ | 下から出てきたパネルであることを示す |
| コメント件数 | 何件コメントがあるか表示する |
| 閉じるボタン | コメント欄を閉じる |
CommentTile | コメント1件分の表示 |
CommentInputBar | コメントを入力して送信する部分 |
TextField | 実際に文字を入力する欄 |
最初は難しく見えるかもしれません。
しかし、これも今までと同じです。
画面を観察する
↓
部品に分ける
↓
1つずつWidgetにする
新しい言葉:showModalBottomSheetとは何か
FlutterでBottomSheetを表示するには、showModalBottomSheet を使います。
showModalBottomSheet(
  context: context,
  builder: (context) {
    return CommentSheet();
  },
);
初心者向けには、次のように理解してください。
showModalBottomSheet = 下から出てくる画面を表示する関数
builder の中で返したWidgetが、下から出てくる画面になります。
showModalBottomSheet
└─ builder
   └─ CommentSheet
新しい言葉:modalとは何か
showModalBottomSheet の modal は、「その画面を閉じるまで、背後の画面を直接操作しにくくする表示」という意味です。
コメント欄を開いている間は、コメント欄が前面に出ます。
動画画面
↓
コメント欄が前面に出る
↓
閉じるまでコメント欄を操作する
難しく考えなくて大丈夫です。
まずは、次の理解で進めてください。
modal = 今の画面の上に、一時的な画面を重ねる仕組み
新しい言葉:TextFieldとは何か
TextField は、ユーザーが文字を入力するためのWidgetです。
コメント入力欄では、TextField を使います。
TextField(
  decoration: InputDecoration(
    hintText: 'コメントを追加...',
  ),
)
hintText は、まだ入力されていないときに薄く表示される案内文です。
コメントを追加...
TikTok風アプリでは、この入力欄にコメントを書いて、送信ボタンで追加します。
新しい言葉:TextEditingControllerとは何か
TextField に入力された文字を取り出すには、TextEditingController を使います。
final TextEditingController controller = TextEditingController();
そして、入力された文字は次のように取り出せます。
final text = controller.text;
初心者向けには、次のように理解してください。
TextEditingController = TextFieldに入力された文字を管理するもの
コメントを送信したら、入力欄を空にすることもできます。
controller.clear();
まずはBottomSheetを開くだけのコード
いきなりコメント一覧まで作ると長くなるので、まずはボタンを押したら下から画面が出ることを確認します。
DartPadに次のコードを貼り付けてください。
import 'package:flutter/material.dart';

void main() {
  runApp(const BottomSheetPracticeApp());
}

class BottomSheetPracticeApp extends StatelessWidget {
  const BottomSheetPracticeApp({super.key});

  @override
  Widget build(BuildContext context) {
    return const MaterialApp(
      debugShowCheckedModeBanner: false,
      home: BottomSheetPracticePage(),
    );
  }
}

class BottomSheetPracticePage extends StatelessWidget {
  const BottomSheetPracticePage({super.key});

  void openCommentSheet(BuildContext context) {
    showModalBottomSheet<void>(
      context: context,
      backgroundColor: Colors.transparent,
      builder: (context) {
        return Container(
          height: 360,
          decoration: const BoxDecoration(
            color: Color(0xFF111111),
            borderRadius: BorderRadius.vertical(
              top: Radius.circular(22),
            ),
          ),
          child: const Center(
            child: Text(
              'コメント欄です',
              style: TextStyle(
                color: Colors.white,
                fontSize: 22,
                fontWeight: FontWeight.bold,
              ),
            ),
          ),
        );
      },
    );
  }

  @override
  Widget build(BuildContext context) {
    return Scaffold(
      backgroundColor: Colors.black,
      body: Center(
        child: GestureDetector(
          onTap: () => openCommentSheet(context),
          child: const Column(
            mainAxisSize: MainAxisSize.min,
            children: [
              Icon(
                Icons.mode_comment_rounded,
                color: Colors.white,
                size: 64,
              ),
              SizedBox(height: 8),
              Text(
                'コメントを開く',
                style: TextStyle(
                  color: Colors.white,
                  fontSize: 16,
                  fontWeight: FontWeight.bold,
                ),
              ),
            ],
          ),
        ),
      ),
    );
  }
}
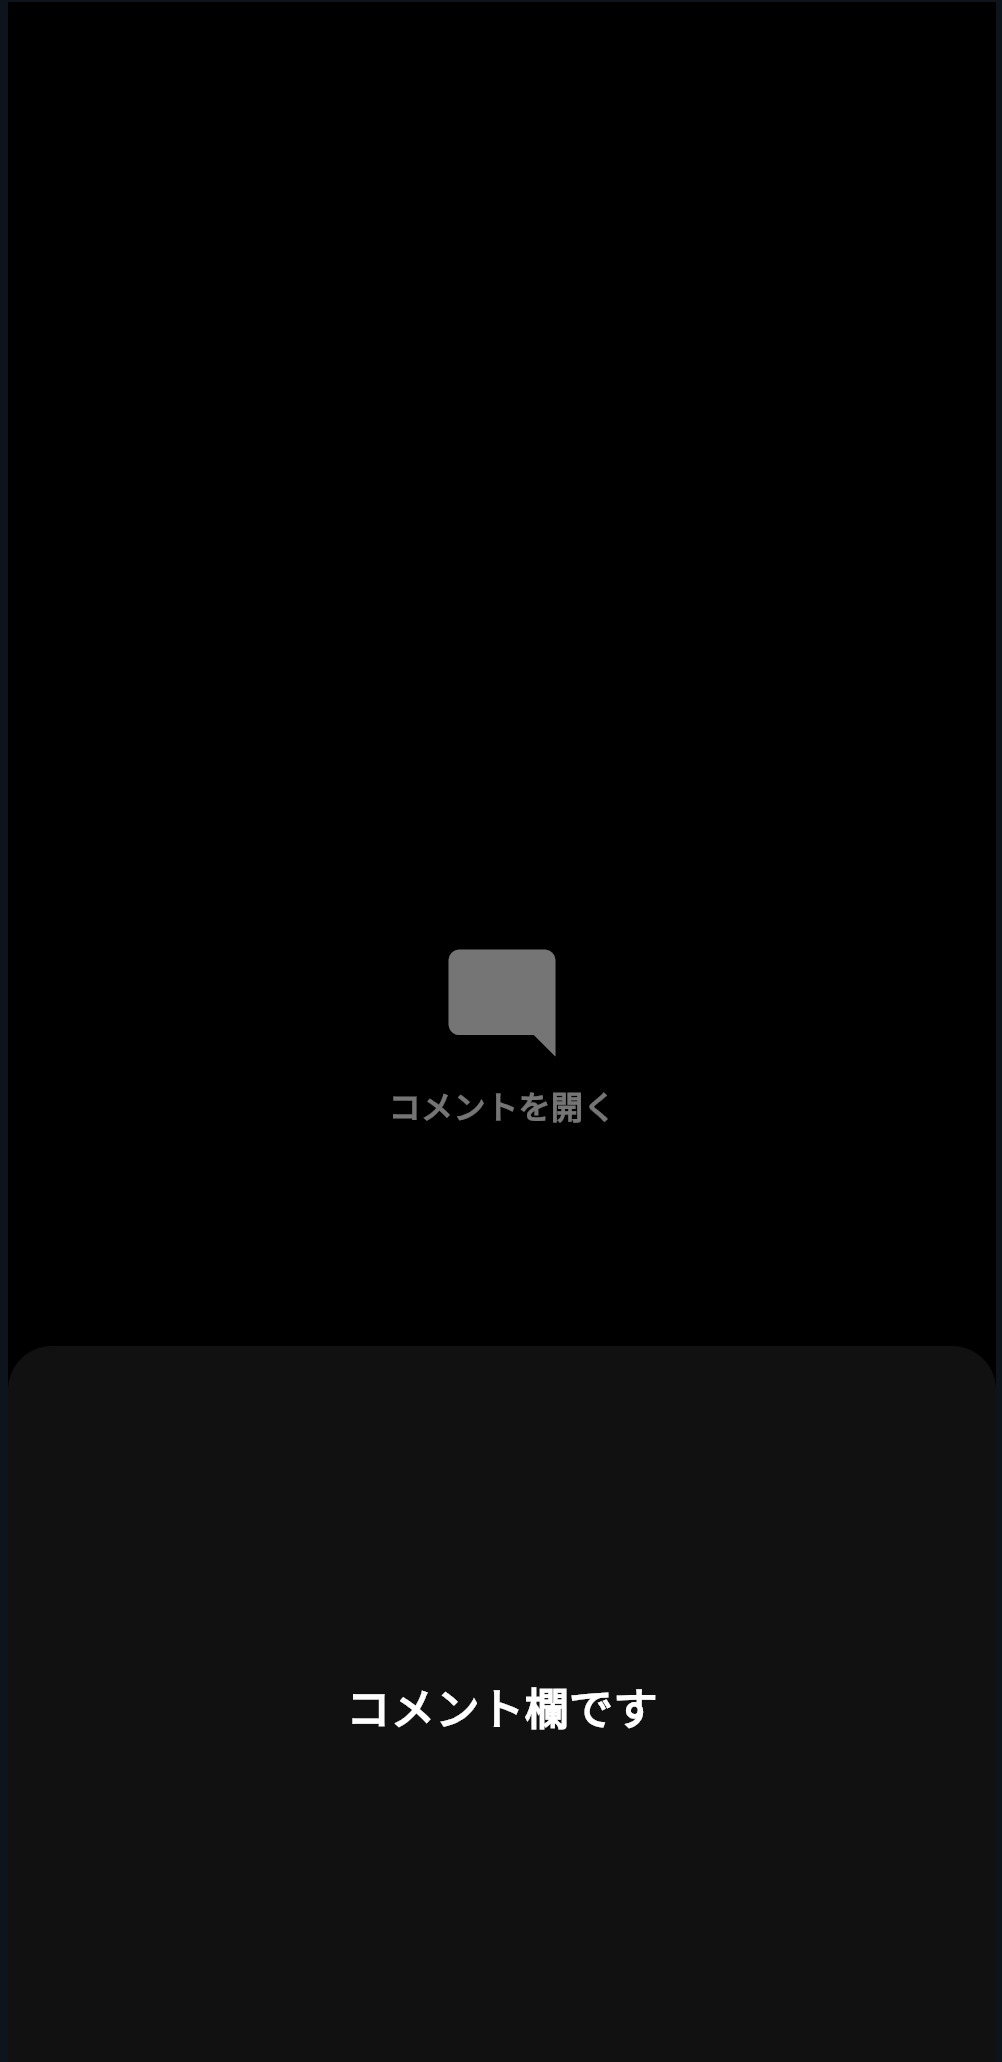
実行して確認すること
実行したら、コメントアイコンを押してください。
画面の下から、黒いコメント欄が出てきます。
コメントアイコンを押す
↓
下からコメント欄が表示される
これが showModalBottomSheet の基本です。
backgroundColorを透明にする理由
今回、次のように書いています。
backgroundColor: Colors.transparent,
これは、BottomSheetの外側の背景を透明にするためです。
そのうえで、中の Container に角丸をつけています。
decoration: const BoxDecoration(
  color: Color(0xFF111111),
  borderRadius: BorderRadius.vertical(
    top: Radius.circular(22),
  ),
),
こうすると、TikTok風の「上だけ角丸のパネル」にできます。
コメント一覧を表示する
次に、コメント一覧を表示します。
コメントは、文字列のListで持ちます。
final List<String> comments = [
  'かわいい…ずっと見ていられます',
  'この雰囲気すごく好きです',
  '癒されました',
];
Listは、複数のデータを順番に持つものです。
comments
├─ 0番目:かわいい…ずっと見ていられます
├─ 1番目:この雰囲気すごく好きです
└─ 2番目:癒されました
このコメントを、画面に一覧表示します。
新しい言葉:ListView.separatedとは何か
コメント一覧には、ListView.separated を使います。
ListView.separated(
  itemCount: comments.length,
  separatorBuilder: (context, index) {
    return const SizedBox(height: 16);
  },
  itemBuilder: (context, index) {
    return Text(comments[index]);
  },
)
ListView.separated は、一覧の項目と項目の間に区切りを入れられるWidgetです。
初心者向けには、次のように理解してください。
ListView.separated = 間隔つきで一覧を表示するWidget
コメント欄では、コメント同士の間に余白を入れたいので便利です。
コメント一覧を表示するコード
DartPadに次のコードを貼り付けてください。
import 'package:flutter/material.dart';

void main() {
  runApp(const CommentListPracticeApp());
}

class CommentListPracticeApp extends StatelessWidget {
  const CommentListPracticeApp({super.key});

  @override
  Widget build(BuildContext context) {
    return const MaterialApp(
      debugShowCheckedModeBanner: false,
      home: CommentListPracticePage(),
    );
  }
}

class CommentListPracticePage extends StatelessWidget {
  const CommentListPracticePage({super.key});

  void openCommentSheet(BuildContext context) {
    final comments = [
      'かわいい…ずっと見ていられます',
      'この雰囲気すごく好きです',
      '癒されました',
      'ペット動画は心が落ち着きます',
    ];

    showModalBottomSheet<void>(
      context: context,
      backgroundColor: Colors.transparent,
      builder: (context) {
        return Container(
          height: MediaQuery.of(context).size.height * 0.68,
          decoration: const BoxDecoration(
            color: Color(0xFF111111),
            borderRadius: BorderRadius.vertical(
              top: Radius.circular(22),
            ),
          ),
          child: Column(
            children: [
              const SizedBox(height: 10),
              Container(
                width: 42,
                height: 4,
                decoration: BoxDecoration(
                  color: Colors.white24,
                  borderRadius: BorderRadius.circular(999),
                ),
              ),
              const SizedBox(height: 12),
              Padding(
                padding: const EdgeInsets.symmetric(horizontal: 16),
                child: Row(
                  children: [
                    const Spacer(),
                    Text(
                      '${comments.length}件のコメント',
                      style: const TextStyle(
                        color: Colors.white,
                        fontSize: 15,
                        fontWeight: FontWeight.bold,
                      ),
                    ),
                    const Spacer(),
                    GestureDetector(
                      onTap: () => Navigator.of(context).pop(),
                      child: const Icon(
                        Icons.close_rounded,
                        color: Colors.white,
                        size: 26,
                      ),
                    ),
                  ],
                ),
              ),
              const SizedBox(height: 10),
              Expanded(
                child: ListView.separated(
                  padding: const EdgeInsets.fromLTRB(16, 8, 16, 16),
                  itemCount: comments.length,
                  separatorBuilder: (context, index) {
                    return const SizedBox(height: 16);
                  },
                  itemBuilder: (context, index) {
                    return CommentTile(
                      index: index,
                      text: comments[index],
                    );
                  },
                ),
              ),
            ],
          ),
        );
      },
    );
  }

  @override
  Widget build(BuildContext context) {
    return Scaffold(
      backgroundColor: Colors.black,
      body: Center(
        child: GestureDetector(
          onTap: () => openCommentSheet(context),
          child: const Column(
            mainAxisSize: MainAxisSize.min,
            children: [
              Icon(
                Icons.mode_comment_rounded,
                color: Colors.white,
                size: 64,
              ),
              SizedBox(height: 8),
              Text(
                'コメントを開く',
                style: TextStyle(
                  color: Colors.white,
                  fontSize: 16,
                  fontWeight: FontWeight.bold,
                ),
              ),
            ],
          ),
        ),
      ),
    );
  }
}

class CommentTile extends StatelessWidget {
  const CommentTile({
    super.key,
    required this.index,
    required this.text,
  });

  final int index;
  final String text;

  @override
  Widget build(BuildContext context) {
    final colors = [
      const Color(0xFFE91E63),
      const Color(0xFF2196F3),
      const Color(0xFFFF9800),
      const Color(0xFF4CAF50),
    ];

    final color = colors[index % colors.length];

    return Row(
      crossAxisAlignment: CrossAxisAlignment.start,
      children: [
        CircleAvatar(
          radius: 18,
          backgroundColor: color,
          child: const Icon(
            Icons.person_rounded,
            color: Colors.white,
            size: 20,
          ),
        ),
        const SizedBox(width: 10),
        Expanded(
          child: Column(
            crossAxisAlignment: CrossAxisAlignment.start,
            children: [
              Text(
                'user_${index + 1}',
                style: TextStyle(
                  color: Colors.white.withOpacity(0.62),
                  fontSize: 12,
                  fontWeight: FontWeight.bold,
                ),
              ),
              const SizedBox(height: 3),
              Text(
                text,
                style: const TextStyle(
                  color: Colors.white,
                  fontSize: 14,
                  height: 1.35,
                  fontWeight: FontWeight.w500,
                ),
              ),
              const SizedBox(height: 5),
              Row(
                children: [
                  Text(
                    '返信',
                    style: TextStyle(
                      color: Colors.white.withOpacity(0.42),
                      fontSize: 12,
                      fontWeight: FontWeight.bold,
                    ),
                  ),
                  const SizedBox(width: 14),
                  Text(
                    'たった今',
                    style: TextStyle(
                      color: Colors.white.withOpacity(0.36),
                      fontSize: 12,
                      fontWeight: FontWeight.w600,
                    ),
                  ),
                ],
              ),
            ],
          ),
        ),
        const SizedBox(width: 8),
        Column(
          children: [
            Icon(
              Icons.favorite_border_rounded,
              color: Colors.white.withOpacity(0.62),
              size: 20,
            ),
            const SizedBox(height: 2),
            Text(
              '${index + 2}',
              style: TextStyle(
                color: Colors.white.withOpacity(0.45),
                fontSize: 11,
                fontWeight: FontWeight.bold,
              ),
            ),
          ],
        ),
      ],
    );
  }
}
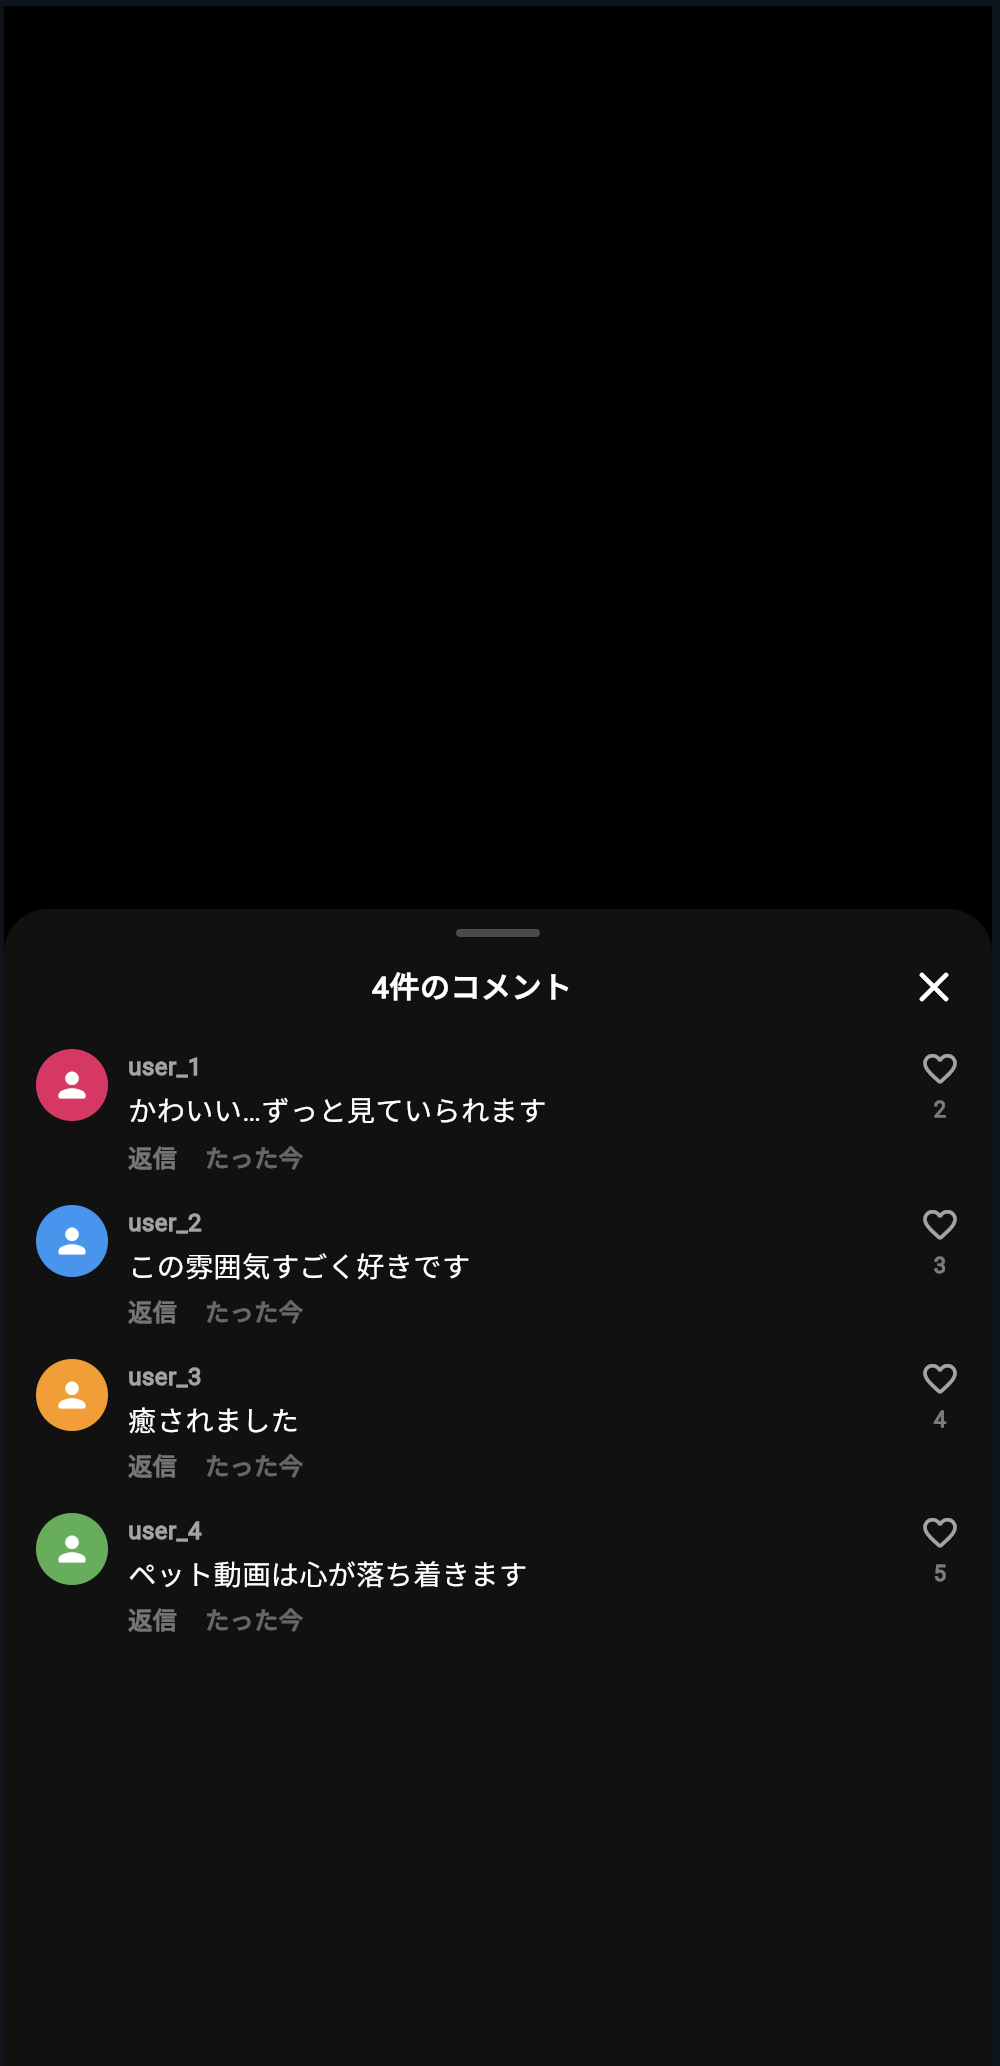
実行して確認すること
コメントアイコンを押すと、コメント欄が下から表示されます。
コメント一覧には、ユーザーアイコン、ユーザー名、コメント本文、返信、時間、ハートが表示されます。
CommentSheet
├─ 4件のコメント
├─ user_1 のコメント
├─ user_2 のコメント
├─ user_3 のコメント
└─ user_4 のコメント
この段階では、まだコメント入力はできません。
次に、入力欄を作ります。
コメント入力欄を作る
TikTok風のコメント欄では、下部に入力欄があります。
自分のアイコン コメントを追加... 送信
Flutterでは、入力欄に TextField を使います。
入力された文字を管理するために、TextEditingController を使います。
StatefulWidgetが必要になる理由
コメントを追加すると、コメント一覧が変わります。
コメントが3件
↓
入力して送信
↓
コメントが4件
画面の状態が変わるため、StatefulWidget が必要です。
特に、コメント欄そのものを StatefulWidget にすると分かりやすいです。
CommentSheet
↓
コメント一覧を持つ
↓
入力されたコメントを追加する
↓
画面を更新する
コメント入力までできる完成コード
ここから、コメント入力と送信までできるコードを作ります。
DartPadに次のコードを貼り付けてください。

import 'package:flutter/material.dart';
void main() {
runApp(const CommentSheetPracticeApp());
}
class CommentSheetPracticeApp extends StatelessWidget {
const CommentSheetPracticeApp({super.key});
@override
Widget build(BuildContext context) {
return const MaterialApp(
debugShowCheckedModeBanner: false,
home: CommentSheetPracticePage(),
);
}
}
class CommentSheetPracticePage extends StatefulWidget {
const CommentSheetPracticePage({super.key});
@override
State<CommentSheetPracticePage> createState() =>
_CommentSheetPracticePageState();
}
class _CommentSheetPracticePageState extends State<CommentSheetPracticePage> {
final List<String> comments = [
'かわいい…ずっと見ていられます',
'この雰囲気すごく好きです',
'癒されました',
];
void openCommentSheet() {
showModalBottomSheet<void>(
context: context,
isScrollControlled: true,
useSafeArea: true,
backgroundColor: Colors.transparent,
builder: (context) {
return CommentSheet(
comments: comments,
onSubmit: (text) {
final trimmedText = text.trim();
if (trimmedText.isEmpty) {
return;
}
setState(() {
comments.insert(0, trimmedText);
});
},
);
},
);
}
@override
Widget build(BuildContext context) {
return Scaffold(
backgroundColor: Colors.black,
body: Stack(
children: [
const Positioned.fill(
child: VideoMockBackground(),
),
Positioned(
right: 16,
bottom: 120,
child: GestureDetector(
onTap: openCommentSheet,
child: Column(
children: [
const Icon(
Icons.mode_comment_rounded,
color: Colors.white,
size: 38,
shadows: [
Shadow(
color: Colors.black54,
blurRadius: 8,
),
],
),
const SizedBox(height: 4),
Text(
'${comments.length}',
style: const TextStyle(
color: Colors.white,
fontSize: 12,
fontWeight: FontWeight.bold,
shadows: [
Shadow(
color: Colors.black87,
blurRadius: 8,
),
],
),
),
],
),
),
),
const Positioned(
left: 16,
right: 96,
bottom: 36,
child: BottomVideoInfo(),
),
],
),
);
}
}
class VideoMockBackground extends StatelessWidget {
const VideoMockBackground({super.key});
@override
Widget build(BuildContext context) {
return DecoratedBox(
decoration: const BoxDecoration(
gradient: LinearGradient(
begin: Alignment.topCenter,
end: Alignment.bottomCenter,
colors: [
Color(0xFFE91E63),
Colors.black,
],
),
),
child: Center(
child: Container(
width: 240,
height: 360,
decoration: BoxDecoration(
color: Colors.white12,
borderRadius: BorderRadius.circular(28),
border: Border.all(
color: Colors.white24,
),
),
child: const Center(
child: Text(
'PET',
style: TextStyle(
color: Colors.white,
fontSize: 40,
fontWeight: FontWeight.bold,
letterSpacing: 2,
),
),
),
),
),
);
}
}
class CommentSheet extends StatefulWidget {
const CommentSheet({
super.key,
required this.comments,
required this.onSubmit,
});
final List<String> comments;
final ValueChanged<String> onSubmit;
@override
State<CommentSheet> createState() => _CommentSheetState();
}
class _CommentSheetState extends State<CommentSheet> {
final TextEditingController controller = TextEditingController();
late List<String> localComments;
@override
void initState() {
super.initState();
localComments = [...widget.comments];
}
@override
void dispose() {
controller.dispose();
super.dispose();
}
void submitComment() {
final text = controller.text.trim();
if (text.isEmpty) {
return;
}
widget.onSubmit(text);
setState(() {
localComments.insert(0, text);
controller.clear();
});
}
@override
Widget build(BuildContext context) {
final bottomInset = MediaQuery.of(context).viewInsets.bottom;
return AnimatedPadding(
duration: const Duration(milliseconds: 180),
curve: Curves.easeOut,
padding: EdgeInsets.only(bottom: bottomInset),
child: Container(
height: MediaQuery.of(context).size.height * 0.72,
decoration: const BoxDecoration(
color: Color(0xFF111111),
borderRadius: BorderRadius.vertical(
top: Radius.circular(22),
),
),
child: Column(
children: [
const SizedBox(height: 10),
Container(
width: 42,
height: 4,
decoration: BoxDecoration(
color: Colors.white24,
borderRadius: BorderRadius.circular(999),
),
),
const SizedBox(height: 12),
Padding(
padding: const EdgeInsets.symmetric(horizontal: 16),
child: Row(
children: [
const Spacer(),
Text(
'${localComments.length}件のコメント',
style: const TextStyle(
color: Colors.white,
fontSize: 15,
fontWeight: FontWeight.bold,
),
),
const Spacer(),
GestureDetector(
onTap: () => Navigator.of(context).pop(),
child: const Icon(
Icons.close_rounded,
color: Colors.white,
size: 26,
),
),
],
),
),
const SizedBox(height: 10),
Expanded(
child: ListView.separated(
padding: const EdgeInsets.fromLTRB(16, 8, 16, 12),
itemCount: localComments.length,
separatorBuilder: (context, index) {
return const SizedBox(height: 16);
},
itemBuilder: (context, index) {
return CommentTile(
index: index,
text: localComments[index],
);
},
),
),
CommentInputBar(
controller: controller,
onSubmit: submitComment,
),
],
),
),
);
}
}
class CommentTile extends StatelessWidget {
const CommentTile({
super.key,
required this.index,
required this.text,
});
final int index;
final String text;
@override
Widget build(BuildContext context) {
final colors = [
const Color(0xFFE91E63),
const Color(0xFF2196F3),
const Color(0xFFFF9800),
const Color(0xFF4CAF50),
];
final color = colors[index % colors.length];
return Row(
crossAxisAlignment: CrossAxisAlignment.start,
children: [
CircleAvatar(
radius: 18,
backgroundColor: color,
child: const Icon(
Icons.person_rounded,
color: Colors.white,
size: 20,
),
),
const SizedBox(width: 10),
Expanded(
child: Column(
crossAxisAlignment: CrossAxisAlignment.start,
children: [
Text(
'user_${index + 1}',
style: TextStyle(
color: Colors.white.withOpacity(0.62),
fontSize: 12,
fontWeight: FontWeight.bold,
),
),
const SizedBox(height: 3),
Text(
text,
style: const TextStyle(
color: Colors.white,
fontSize: 14,
height: 1.35,
fontWeight: FontWeight.w500,
),
),
const SizedBox(height: 5),
Row(
children: [
Text(
'返信',
style: TextStyle(
color: Colors.white.withOpacity(0.42),
fontSize: 12,
fontWeight: FontWeight.bold,
),
),
const SizedBox(width: 14),
Text(
'たった今',
style: TextStyle(
color: Colors.white.withOpacity(0.36),
fontSize: 12,
fontWeight: FontWeight.w600,
),
),
],
),
],
),
),
const SizedBox(width: 8),
Column(
children: [
Icon(
Icons.favorite_border_rounded,
color: Colors.white.withOpacity(0.62),
size: 20,
),
const SizedBox(height: 2),
Text(
'${index + 2}',
style: TextStyle(
color: Colors.white.withOpacity(0.45),
fontSize: 11,
fontWeight: FontWeight.bold,
),
),
],
),
],
);
}
}
class CommentInputBar extends StatelessWidget {
const CommentInputBar({
super.key,
required this.controller,
required this.onSubmit,
});
final TextEditingController controller;
final VoidCallback onSubmit;
@override
Widget build(BuildContext context) {
return SafeArea(
top: false,
child: Container(
padding: const EdgeInsets.fromLTRB(12, 10, 12, 10),
decoration: BoxDecoration(
color: const Color(0xFF111111),
border: Border(
top: BorderSide(
color: Colors.white.withOpacity(0.08),
),
),
),
child: Row(
children: [
const CircleAvatar(
radius: 18,
backgroundColor: Color(0xFF444444),
child: Icon(
Icons.person_rounded,
color: Colors.white,
size: 20,
),
),
const SizedBox(width: 10),
Expanded(
child: Container(
height: 42,
padding: const EdgeInsets.symmetric(horizontal: 14),
decoration: BoxDecoration(
color: Colors.white.withOpacity(0.09),
borderRadius: BorderRadius.circular(999),
),
alignment: Alignment.center,
child: TextField(
controller: controller,
style: const TextStyle(
color: Colors.white,
fontSize: 14,
),
cursorColor: Colors.white,
decoration: InputDecoration(
isCollapsed: true,
border: InputBorder.none,
hintText: 'コメントを追加...',
hintStyle: TextStyle(
color: Colors.white.withOpacity(0.42),
fontSize: 14,
),
),
onSubmitted: (_) => onSubmit(),
),
),
),
const SizedBox(width: 8),
GestureDetector(
onTap: onSubmit,
child: Container(
height: 42,
padding: const EdgeInsets.symmetric(horizontal: 14),
decoration: BoxDecoration(
color: const Color(0xFFFF2D55),
borderRadius: BorderRadius.circular(999),
),
alignment: Alignment.center,
child: const Text(
'送信',
style: TextStyle(
color: Colors.white,
fontSize: 13,
fontWeight: FontWeight.bold,
),
),
),
),
],
),
),
);
}
}
class BottomVideoInfo extends StatelessWidget {
const BottomVideoInfo({super.key});
@override
Widget build(BuildContext context) {
return const SafeArea(
top: false,
child: Column(
crossAxisAlignment: CrossAxisAlignment.start,
children: [
Text(
'@pet_cafe_diary',
style: TextStyle(
color: Colors.white,
fontSize: 16,
fontWeight: FontWeight.bold,
shadows: [
Shadow(
color: Colors.black87,
blurRadius: 8,
),
],
),
),
SizedBox(height: 8),
Text(
'小さな命の動きは、見ているだけで少しやさしい気持ちになる。今日はペットカフェ風の癒し動画。',
maxLines: 2,
overflow: TextOverflow.ellipsis,
style: TextStyle(
color: Colors.white,
fontSize: 14,
height: 1.35,
shadows: [
Shadow(
color: Colors.black87,
blurRadius: 8,
),
],
),
),
],
),
);
}
}
実行して確認すること
実行したら、コメントアイコンを押してください。
下からコメント欄が表示されます。
入力欄にコメントを書いて、送信ボタンを押してください。
コメントを書く
↓
送信する
↓
コメント一覧の一番上に追加される
↓
コメント件数も増える
この流れが、TikTok風コメント欄の基本です。
openCommentSheetの解説
メイン画面側では、コメント欄を開く関数を作っています。
void openCommentSheet() {
  showModalBottomSheet<void>(
    context: context,
    isScrollControlled: true,
    useSafeArea: true,
    backgroundColor: Colors.transparent,
    builder: (context) {
      return CommentSheet(
        comments: comments,
        onSubmit: (text) {
          final trimmedText = text.trim();

          if (trimmedText.isEmpty) {
            return;
          }

          setState(() {
            comments.insert(0, trimmedText);
          });
        },
      );
    },
  );
}
ここで、CommentSheet に2つの値を渡しています。
| 渡しているもの | 役割 |
|---|---|
comments | 現在のコメント一覧 |
onSubmit | コメント送信時に実行する処理 |
CommentSheet は、表示と入力を担当します。
メイン画面側は、実際のコメント一覧を管理します。
親Widget
↓
コメント一覧を持つ

CommentSheet
↓
コメントを表示・入力する
isScrollControlledとは何か
showModalBottomSheet では、次のように書いています。
isScrollControlled: true,
これは、BottomSheetの高さやキーボード表示に対応しやすくするための設定です。
初心者向けには、次のように理解してください。
isScrollControlled: true
↓
BottomSheetを大きく表示したり、入力欄に対応しやすくする設定
コメント欄のように、画面の大部分を使うUIでは、入れておくと便利です。
useSafeAreaとは何か
useSafeArea: true,
useSafeArea は、スマホのノッチや画面端にUIが重なりにくくするための設定です。
コメント欄は画面下から出るため、端末によっては下部や上部の安全領域を考える必要があります。
useSafeArea: true
↓
見切れにくい表示にする
CommentSheetの役割
CommentSheet は、コメント欄全体を担当するWidgetです。
class CommentSheet extends StatefulWidget {
  const CommentSheet({
    super.key,
    required this.comments,
    required this.onSubmit,
  });

  final List<String> comments;
  final ValueChanged<String> onSubmit;
ここでは、コメント一覧と送信処理を受け取っています。
ValueChanged<String> は、文字列を受け取る関数の型です。
初心者向けには、次のように理解してください。
ValueChanged<String> = Stringを受け取って実行する処理
今回なら、入力されたコメント文字列を親Widgetに渡すために使っています。
localCommentsを作る理由
CommentSheet の中では、次のように書いています。
late List<String> localComments;
そして、initState でコピーしています。
localComments = [...widget.comments];
これは、親から受け取ったコメント一覧を、BottomSheet内でも表示更新しやすくするためです。
親のcomments
↓
CommentSheetに渡す
↓
localCommentsとしてコピー
↓
BottomSheet内で表示する
[...] は、Listをコピーする書き方です。
submitCommentの解説
コメント送信の中心は、この関数です。
void submitComment() {
  final text = controller.text.trim();

  if (text.isEmpty) {
    return;
  }

  widget.onSubmit(text);

  setState(() {
    localComments.insert(0, text);
    controller.clear();
  });
}
順番に見ると、次の流れです。
入力された文字を取り出す
↓
前後の空白を削る
↓
空なら何もしない
↓
親Widgetに送信する
↓
BottomSheet内のコメント一覧にも追加する
↓
入力欄を空にする
trimとは何か
final text = controller.text.trim();
trim は、文字の前後にある空白を削る処理です。
たとえば、次のような入力があったとします。
こんにちは
trim() を使うと、次のようになります。
こんにちは
コメントが空白だけの場合も、空文字として扱いやすくなります。
isEmptyとは何か
if (text.isEmpty) {
  return;
}
isEmpty は、文字列が空かどうかを確認するpropertyです。
text が空
↓
true

text に文字がある
↓
false
空コメントを追加しないために使っています。
insert(0, text)とは何か
localComments.insert(0, text);
insert は、Listの指定した位置にデータを追加する処理です。
0 を指定しているので、一番上に追加します。
新しいコメント
↓
コメント一覧の先頭に追加
TikTok風コメント欄では、新しいコメントが上に見えると分かりやすいため、ここでは insert(0, text) にしています。
もし末尾に追加したい場合は、次のように書きます。
localComments.add(text);
controller.clearとは何か
controller.clear();
これは、入力欄を空にする処理です。
コメント送信後も入力文字が残っていると、次のコメントを入力しにくくなります。
そのため、送信後にクリアしています。
送信
↓
コメント追加
↓
入力欄を空にする
キーボード表示への対応
CommentSheet では、次のコードを使っています。
final bottomInset = MediaQuery.of(context).viewInsets.bottom;
これは、キーボードが表示されたときに、画面下からどれくらい隠れるかを取得しています。
そして、AnimatedPadding で下に余白を追加しています。
AnimatedPadding(
  duration: const Duration(milliseconds: 180),
  curve: Curves.easeOut,
  padding: EdgeInsets.only(bottom: bottomInset),
  child: ...
)
これにより、キーボードが出たときにコメント入力欄が隠れにくくなります。
初心者向けには、次の理解で大丈夫です。
キーボードが出る
↓
入力欄が隠れそうになる
↓
AnimatedPaddingで持ち上げる
CommentInputBarの役割
CommentInputBar は、コメント入力欄の部品です。
CommentInputBar
├─ 自分のアイコン
├─ TextField
└─ 送信ボタン
コードでは、次のようにcontrollerと送信処理を受け取っています。
class CommentInputBar extends StatelessWidget {
  const CommentInputBar({
    super.key,
    required this.controller,
    required this.onSubmit,
  });

  final TextEditingController controller;
  final VoidCallback onSubmit;
TextField には、controllerを渡します。
TextField(
  controller: controller,
)
送信ボタンを押したら、onSubmit を呼びます。
GestureDetector(
  onTap: onSubmit,
  child: ...
)
TextFieldの設定を見る
TextField(
  controller: controller,
  style: const TextStyle(
    color: Colors.white,
    fontSize: 14,
  ),
  cursorColor: Colors.white,
  decoration: InputDecoration(
    isCollapsed: true,
    border: InputBorder.none,
    hintText: 'コメントを追加...',
    hintStyle: TextStyle(
      color: Colors.white.withOpacity(0.42),
      fontSize: 14,
    ),
  ),
  onSubmitted: (_) => onSubmit(),
)
主な設定は、次の通りです。
| 設定 | 意味 |
|---|---|
controller | 入力文字を管理する |
style | 入力中の文字の見た目 |
cursorColor | カーソルの色 |
hintText | 入力前に表示される案内文 |
border: InputBorder.none | 枠線を消す |
onSubmitted | キーボードで送信したときの処理 |
Navigator.of(context).popとは何か
閉じるボタンでは、次の処理を使っています。
Navigator.of(context).pop()
これは、今表示している画面を閉じる処理です。
BottomSheetの場合は、表示中のコメント欄を閉じます。
初心者向けには、次のように理解してください。
Navigator.of(context).pop()
↓
今開いている画面を閉じる
最終アプリとのつながり
最終的なTikTok風アプリでは、コメントボタンを押したときに、次のように呼び出します。
onTapComment: () => openCommentSheet(videoIndex),
videoIndex を渡すことで、動画ごとにコメント一覧を分けられます。
videos[0] のコメント
videos[1] のコメント
videos[2] のコメント
そのため、完成コードでは次のようなMapを使います。
final Map<int, List<String>> commentMap = {
  0: ['かわいい…ずっと見ていられます'],
  1: ['食と自然の組み合わせ、いいですね'],
  2: ['午後の空気感が素敵'],
};
これは、動画番号ごとにコメント一覧を持つ仕組みです。
commentMap
├─ 0番動画のコメント一覧
├─ 1番動画のコメント一覧
└─ 2番動画のコメント一覧
新しい言葉:Mapとは何か
Map は、キーと値の組み合わせでデータを持つものです。
final Map<int, List<String>> commentMap = {
  0: ['かわいい'],
  1: ['おいしそう'],
};
この場合、キーは動画番号です。
値はコメント一覧です。
| キー | 値 |
|---|---|
0 | 0番動画のコメント一覧 |
1 | 1番動画のコメント一覧 |
初心者向けには、次のように理解してください。
Map = 名前や番号を使って、対応するデータを取り出す箱
手を動かす練習1:初期コメントを増やす
次の部分を探してください。
final List<String> comments = [
  'かわいい…ずっと見ていられます',
  'この雰囲気すごく好きです',
  '癒されました',
];
ここに1行追加してみてください。
'音楽もやさしくて好きです',
コメント欄を開くと、最初からコメントが1件増えています。
手を動かす練習2:BottomSheetの高さを変える
次の部分を探してください。
height: MediaQuery.of(context).size.height * 0.72,
これを次のように変えてみます。
height: MediaQuery.of(context).size.height * 0.55,
コメント欄の高さが低くなります。
0.72 は、画面高さの72%という意味です。
手を動かす練習3:送信ボタンの色を変える
次の部分を探してください。
color: const Color(0xFFFF2D55),
これを次のように変えてみてください。
color: Colors.blueAccent,
送信ボタンの色が変わります。
手を動かす練習4:新しいコメントを下に追加する
現在は、次のコードで一番上にコメントを追加しています。
localComments.insert(0, text);
これを次のように変えると、最後に追加されます。
localComments.add(text);
新しいコメントがどこに追加されるかを確認してみてください。
手を動かす練習5:空コメントを許可するとどうなるか考える
次の部分を一時的にコメントアウトしてみます。
if (text.isEmpty) {
  return;
}
すると、空文字のコメントも追加できてしまいます。
実際のアプリでは、空コメントは追加しないほうが自然です。
確認したら、元に戻してください。
よくあるつまずき1:TextFieldの文字が取り出せない
入力された文字を取り出すには、TextEditingController が必要です。
final TextEditingController controller = TextEditingController();
そして、次のように取り出します。
controller.text
TextField にもcontrollerを渡す必要があります。
TextField(
  controller: controller,
)
よくあるつまずき2:コメントを追加しても画面が変わらない
コメント一覧を変えたら、setState を呼ぶ必要があります。
setState(() {
  localComments.insert(0, text);
});
setState がないと、値は変わっていても画面が更新されないことがあります。
Listを変更する
↓
setStateで知らせる
↓
画面が更新される
よくあるつまずき3:BottomSheetを閉じられない
閉じるには、次のコードを使います。
Navigator.of(context).pop();
閉じるアイコンの onTap に設定します。
GestureDetector(
  onTap: () => Navigator.of(context).pop(),
  child: Icon(Icons.close_rounded),
)
よくあるつまずき4:キーボードで入力欄が隠れる
キーボードが出たときに入力欄が隠れる場合は、次の設定を確認します。
isScrollControlled: true,
さらに、BottomSheet内で AnimatedPadding と viewInsets.bottom を使うと、入力欄が持ち上がりやすくなります。
final bottomInset = MediaQuery.of(context).viewInsets.bottom;
よくあるつまずき5:親と子のコメント一覧がずれる
今回のコードでは、親の comments と、BottomSheet内の localComments の両方を更新しています。
widget.onSubmit(text);

setState(() {
  localComments.insert(0, text);
  controller.clear();
});
親に伝えるのが widget.onSubmit(text) です。
BottomSheet内の表示を更新するのが localComments.insert(0, text) です。
親のコメント一覧
↓
アプリ全体の状態

localComments
↓
BottomSheet内の表示
この節の確認問題
確認問題1
BottomSheet とは何ですか。
答え
画面の下から出てくるパネルのようなUIです。
コメント欄や選択メニューなどに使えます。
確認問題2
showModalBottomSheet は何をする関数ですか。
答え
画面下から表示される一時的な画面を開く関数です。
確認問題3
TextField は何をするWidgetですか。
答え
ユーザーが文字を入力するためのWidgetです。
確認問題4
TextEditingController は何のために使いますか。
答え
TextField に入力された文字を管理し、取り出すために使います。
確認問題5
コメントを送信したあと、入力欄を空にするには何を使いますか。
答え
controller.clear() を使います。
確認問題6
ListView.separated は何をするWidgetですか。
答え
一覧を表示しながら、項目と項目の間に区切りや余白を入れられるWidgetです。
確認問題7
Navigator.of(context).pop() は何をしますか。
答え
現在開いている画面を閉じます。
BottomSheetの場合は、コメント欄を閉じます。
この節のまとめ
この節では、コメントボタンを押したときに、TikTok風のコメント入力画面を下から表示する方法を学びました。
使った中心の仕組みは、showModalBottomSheet です。
showModalBottomSheet(
  context: context,
  builder: (context) {
    return CommentSheet(...);
  },
);
コメント欄の中では、コメント一覧を ListView.separated で表示しました。
ListView.separated(
  itemCount: localComments.length,
  itemBuilder: (context, index) {
    return CommentTile(
      index: index,
      text: localComments[index],
    );
  },
)
コメント入力には、TextField と TextEditingController を使いました。
TextField(
  controller: controller,
)
送信時には、入力された文字を取り出し、空でなければコメント一覧に追加しました。
final text = controller.text.trim();

if (text.isEmpty) {
  return;
}

localComments.insert(0, text);
controller.clear();
この節で一番大切なのは、次の一文です。
コメント欄のような追加画面は、BottomSheetで表示し、TextFieldとControllerで入力を管理する。
次の節では、動画下部に表示されるユーザー名・キャプション・音源表示を、よりTikTok風の情報設計として整えていきます。