CONTENT
ここから
この節で学ぶこと
前回の 5-4 では、Discord風UIを作るために、色・余白・角丸を定数として管理する方法を学びました。
DiscordColors
DiscordSpacing
DiscordRadius
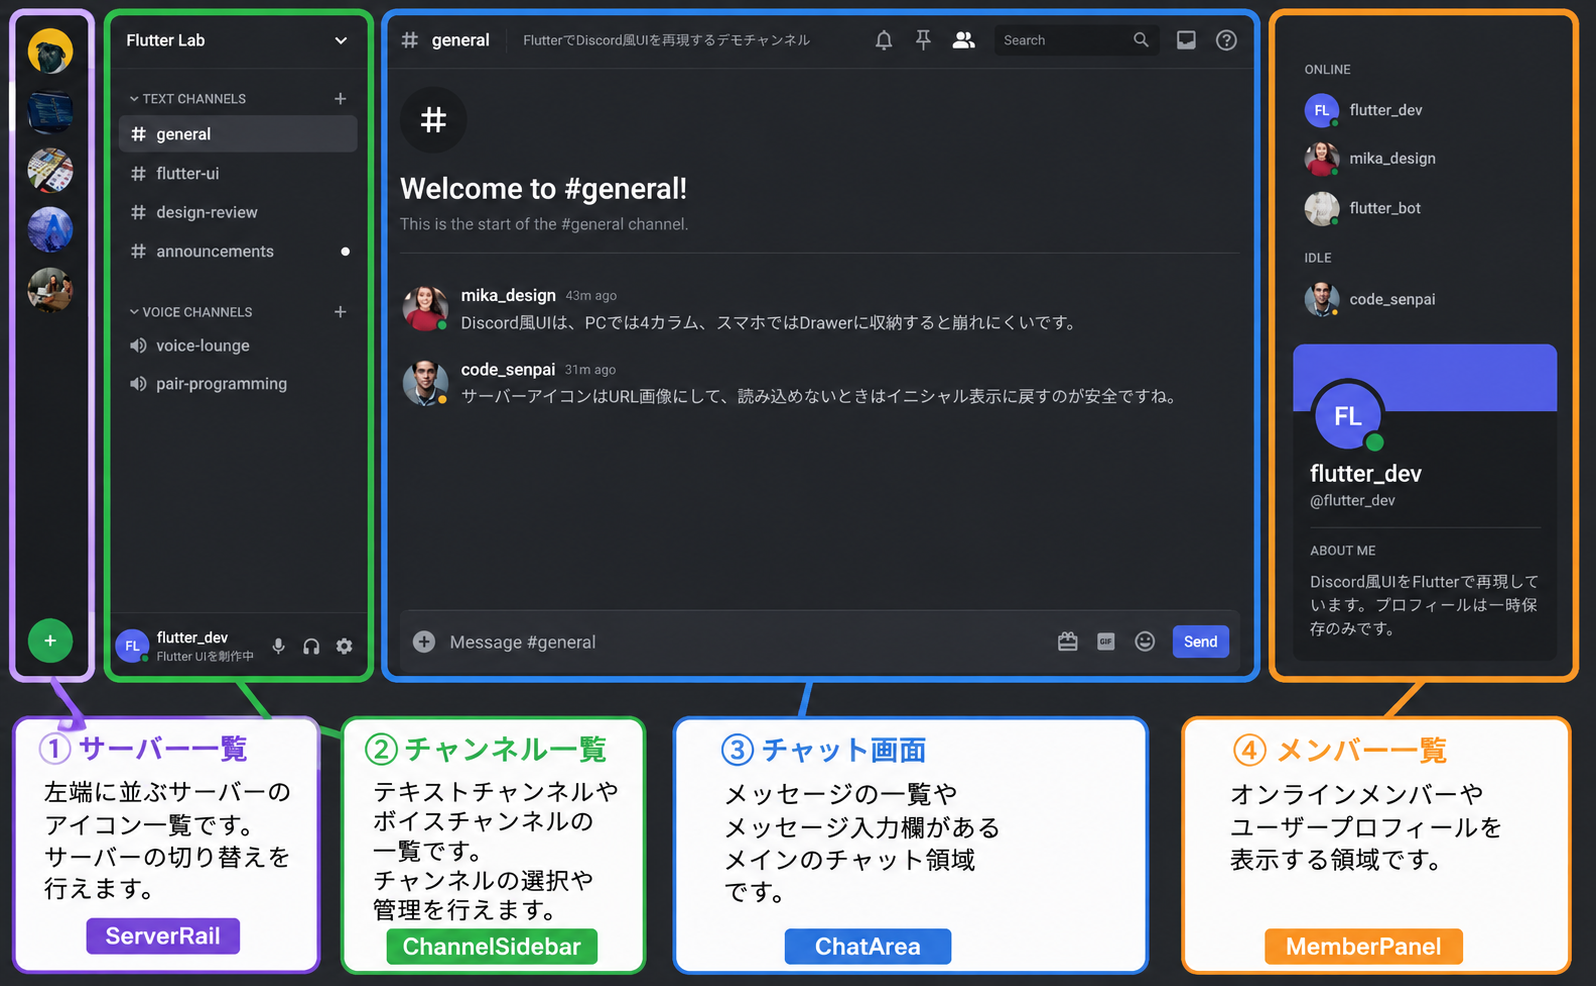
今回の 5-5 では、Discordの画面でとても特徴的な、左端のサーバー一覧UIを作ります。
Discord風アプリのPC表示では、画面の一番左に丸いサーバーアイコンが縦に並びます。
この節では、次の内容を実装します。
丸いサーバーアイコン
選択中のインジケーター
hover風のアニメーション
サーバー画像URLの表示
画像が読み込めないときの代替表示
この節で一番大切なのは、次の一文です。
サーバー一覧は、ListViewで縦に並べ、ServerIconという小さなWidgetを繰り返して作る。
今回作る部品
今回作る主なWidgetは、次の2つです。
| Widget名 | 役割 |
|---|---|
ServerRail | 左端のサーバー一覧全体 |
ServerIcon | 丸いサーバーアイコン1つ分 |
構造で見ると、次のようになります。
ServerRail
└─ ListView
   ├─ ServerIcon
   ├─ ServerIcon
   ├─ ServerIcon
   └─ ServerIcon
まずは、サーバーアイコンを1つ作り、それを縦に並べていきます。
まず完成イメージを分解する
Discord風のサーバーアイコンには、いくつかの特徴があります。
丸いアイコン
暗い背景
選択中のときは左に白いバーが出る
hover時に少し角丸が変わる
画像がある場合は画像を表示する
画像がない場合は文字を表示する
このようなUIを見ると難しそうに感じます。
しかし、分解すると次のようになります。
外側:SizedBoxで高さを決める
中身:Stackで左インジケーターとアイコンを重ねる
アイコン:AnimatedContainerで形を変える
画像:Image.networkで表示する
代替:Textでラベルを表示する
今回も、いきなり全部を作るのではなく、小さく作っていきます。
サーバー1つ分のデータを考える
まず、サーバーアイコンを表示するには、どんなデータが必要でしょうか。
1つのサーバーには、次の情報があると便利です。
| 情報 | 例 | 用途 |
|---|---|---|
| サーバー名 | Flutter Lab | Tooltipや表示名に使う |
| ラベル | FL | 画像がない場合の代替表示 |
| 画像URL | https://... | サーバーアイコン画像 |
| 色 | DiscordColors.blurple | 画像がない場合の背景色 |
これを DiscordServer classとして作ります。
class DiscordServer {
  const DiscordServer({
    required this.name,
    required this.label,
    required this.imageUrl,
    required this.color,
  });

  final String name;
  final String label;
  final String imageUrl;
  final Color color;
}
DiscordServer classの意味
このclassは、サーバー1つ分の設計図です。
DiscordServer
├─ name
├─ label
├─ imageUrl
└─ color
たとえば、Flutter Lab というサーバーは、次のように作れます。
const DiscordServer(
  name: 'Flutter Lab',
  label: 'FL',
  imageUrl: 'https://images.unsplash.com/photo-1555066931-4365d14bab8c?w=200&h=200&fit=crop',
  color: DiscordColors.blurple,
)
このデータをもとに、ServerIcon が画面に表示されます。
DiscordServerデータ
↓
ServerIcon
↓
丸いサーバーアイコンとして表示
サーバーデータをListで持つ
サーバーは1つではなく、複数あります。
そのため、List<DiscordServer> として持ちます。
final List<DiscordServer> servers = const [
  DiscordServer(
    name: 'Flutter Lab',
    label: 'FL',
    imageUrl:
        'https://images.unsplash.com/photo-1555066931-4365d14bab8c?w=200&h=200&fit=crop',
    color: DiscordColors.blurple,
  ),
  DiscordServer(
    name: 'Design Hub',
    label: 'UI',
    imageUrl:
        'https://images.unsplash.com/photo-1561070791-2526d30994b5?w=200&h=200&fit=crop',
    color: Color(0xFFEB459E),
  ),
  DiscordServer(
    name: 'AI Studio',
    label: 'AI',
    imageUrl:
        'https://images.unsplash.com/photo-1677442136019-21780ecad995?w=200&h=200&fit=crop',
    color: DiscordColors.green,
  ),
];
List にすることで、あとから ListView.builder で縦に並べることができます。
ListView.builderとは何か
ListView.builder は、複数のデータをもとに一覧を作るWidgetです。
初心者向けには、次のように理解してください。
ListView.builder
↓
Listの中身を1つずつ取り出して、画面に並べるWidget
サーバー一覧では、次のような流れになります。
servers
├─ Flutter Lab
├─ Design Hub
└─ AI Studio

↓ ListView.builder

ServerIcon
ServerIcon
ServerIcon
コードの形は、次のようになります。
ListView.builder(
  itemCount: servers.length,
  itemBuilder: (context, index) {
    final server = servers[index];

    return ServerIcon(
      server: server,
      selected: selectedIndex == index,
      onTap: () {},
    );
  },
)
まずは最小のサーバー一覧を作る

最初は、アニメーションや画像表示なしで、丸いアイコンを縦に並べます。
次のコードを main.dart に貼り付けてください。
import 'package:flutter/material.dart';

void main() {
  runApp(const ServerRailPracticeApp());
}

class ServerRailPracticeApp extends StatelessWidget {
  const ServerRailPracticeApp({super.key});

  @override
  Widget build(BuildContext context) {
    return MaterialApp(
      title: 'Server Rail Practice',
      debugShowCheckedModeBanner: false,
      theme: ThemeData(
        brightness: Brightness.dark,
        scaffoldBackgroundColor: DiscordColors.background,
      ),
      home: const ServerRailPracticePage(),
    );
  }
}

class DiscordColors {
  static const Color appRail = Color(0xFF1E1F22);
  static const Color background = Color(0xFF313338);
  static const Color textPrimary = Color(0xFFF2F3F5);
  static const Color blurple = Color(0xFF5865F2);
  static const Color green = Color(0xFF23A559);
}

class DiscordSpacing {
  static const double sm = 8;
  static const double md = 12;
}

class DiscordRadius {
  static const double circle = 999;
}

class DiscordServer {
  const DiscordServer({
    required this.name,
    required this.label,
    required this.imageUrl,
    required this.color,
  });

  final String name;
  final String label;
  final String imageUrl;
  final Color color;
}

const servers = [
  DiscordServer(
    name: 'Flutter Lab',
    label: 'FL',
    imageUrl: '',
    color: DiscordColors.blurple,
  ),
  DiscordServer(
    name: 'Design Hub',
    label: 'UI',
    imageUrl: '',
    color: Color(0xFFEB459E),
  ),
  DiscordServer(
    name: 'AI Studio',
    label: 'AI',
    imageUrl: '',
    color: DiscordColors.green,
  ),
];

class ServerRailPracticePage extends StatelessWidget {
  const ServerRailPracticePage({super.key});

  @override
  Widget build(BuildContext context) {
    return const Scaffold(
      body: Row(
        children: [
          SizedBox(
            width: 72,
            child: ServerRail(),
          ),
          Expanded(
            child: Center(
              child: Text(
                'ここにチャット画面が入ります',
                style: TextStyle(
                  color: DiscordColors.textPrimary,
                  fontSize: 24,
                  fontWeight: FontWeight.bold,
                ),
              ),
            ),
          ),
        ],
      ),
    );
  }
}

class ServerRail extends StatelessWidget {
  const ServerRail({super.key});

  @override
  Widget build(BuildContext context) {
    return Container(
      color: DiscordColors.appRail,
      child: ListView.builder(
        padding: const EdgeInsets.symmetric(vertical: DiscordSpacing.md),
        itemCount: servers.length,
        itemBuilder: (context, index) {
          final server = servers[index];

          return ServerIcon(server: server);
        },
      ),
    );
  }
}

class ServerIcon extends StatelessWidget {
  const ServerIcon({
    super.key,
    required this.server,
  });

  final DiscordServer server;

  @override
  Widget build(BuildContext context) {
    return Container(
      height: 58,
      alignment: Alignment.center,
      child: Container(
        width: 48,
        height: 48,
        alignment: Alignment.center,
        decoration: BoxDecoration(
          color: server.color,
          borderRadius: BorderRadius.circular(DiscordRadius.circle),
        ),
        child: Text(
          server.label,
          style: const TextStyle(
            color: DiscordColors.textPrimary,
            fontSize: 16,
            fontWeight: FontWeight.bold,
          ),
        ),
      ),
    );
  }
}
実行して確認すること
実行すると、左端に丸いサーバーアイコンが縦に並びます。
FL
UI
AI
この段階で、次のことができています。
サーバー1つ分のデータをclassで作る
サーバーをListで持つ
ListView.builderで縦に並べる
ServerIconで1つずつ表示する
まだDiscordらしいアニメーションはありませんが、基本構造はできました。
ServerRailの役割
ServerRail は、左端のサーバー一覧全体を担当するWidgetです。
class ServerRail extends StatelessWidget {
  const ServerRail({super.key});

  @override
  Widget build(BuildContext context) {
    return Container(
      color: DiscordColors.appRail,
      child: ListView.builder(
        padding: const EdgeInsets.symmetric(vertical: DiscordSpacing.md),
        itemCount: servers.length,
        itemBuilder: (context, index) {
          final server = servers[index];

          return ServerIcon(server: server);
        },
      ),
    );
  }
}
役割を分解すると、次のようになります。
Container
↓
左端の背景色をつける

ListView.builder
↓
サーバーアイコンを縦に並べる

ServerIcon
↓
サーバー1つ分を表示する
ServerIconの役割
ServerIcon は、丸いサーバーアイコン1つ分を表示するWidgetです。
class ServerIcon extends StatelessWidget {
  const ServerIcon({
    super.key,
    required this.server,
  });

  final DiscordServer server;

  @override
  Widget build(BuildContext context) {
    return Container(
      height: 58,
      alignment: Alignment.center,
      child: Container(
        width: 48,
        height: 48,
        alignment: Alignment.center,
        decoration: BoxDecoration(
          color: server.color,
          borderRadius: BorderRadius.circular(DiscordRadius.circle),
        ),
        child: Text(server.label),
      ),
    );
  }
}
server を受け取って、その中の label や color を表示に使っています。
server.label
↓
FL / UI / AI

server.color
↓
アイコン背景色
このように、データをWidgetに渡して表示する流れを覚えてください。
選択中のサーバーを表現する
Discordでは、現在選択中のサーバーの左側に白い縦バーが表示されます。
これを作るためには、selected という状態を ServerIcon に渡します。
ServerIcon(
  server: server,
  selected: selectedIndex == index,
)
selectedIndex は、現在選択しているサーバー番号です。
selectedIndex = 0
↓
0番目のサーバーが選択中
まず、ServerIcon に selected を追加します。
class ServerIcon extends StatelessWidget {
  const ServerIcon({
    super.key,
    required this.server,
    required this.selected,
  });

  final DiscordServer server;
  final bool selected;
}
bool は、true または false の値です。
selected = true
↓
選択中

selected = false
↓
選択中ではない
Stackでインジケーターを重ねる
選択中インジケーターを作るには、Stack を使います。
Stack は、Widgetを重ねるためのWidgetです。
Stack
├─ 左側の白いバー
└─ 中央の丸いアイコン
次のように書きます。
Stack(
  alignment: Alignment.center,
  children: [
    Positioned(
      left: 0,
      child: Container(
        width: 4,
        height: selected ? 40 : 0,
        color: Colors.white,
      ),
    ),
    Container(
      width: 48,
      height: 48,
      ...
    ),
  ],
)
Positioned は、Stack の中で位置を指定するWidgetです。
Positioned(left: 0)
↓
左端に配置する
選択中インジケーターを追加したコード

ServerRail と ServerIcon を、次のように変更します。
class ServerRail extends StatelessWidget {
  const ServerRail({super.key});

  @override
  Widget build(BuildContext context) {
    const selectedIndex = 0;

    return Container(
      color: DiscordColors.appRail,
      child: ListView.builder(
        padding: const EdgeInsets.symmetric(vertical: DiscordSpacing.md),
        itemCount: servers.length,
        itemBuilder: (context, index) {
          final server = servers[index];

          return ServerIcon(
            server: server,
            selected: selectedIndex == index,
          );
        },
      ),
    );
  }
}

class ServerIcon extends StatelessWidget {
  const ServerIcon({
    super.key,
    required this.server,
    required this.selected,
  });

  final DiscordServer server;
  final bool selected;

  @override
  Widget build(BuildContext context) {
    return SizedBox(
      height: 58,
      child: Stack(
        alignment: Alignment.center,
        children: [
          Positioned(
            left: 0,
            child: Container(
              width: 4,
              height: selected ? 40 : 0,
              decoration: const BoxDecoration(
                color: DiscordColors.textPrimary,
                borderRadius: BorderRadius.horizontal(
                  right: Radius.circular(999),
                ),
              ),
            ),
          ),
          Container(
            width: 48,
            height: 48,
            alignment: Alignment.center,
            decoration: BoxDecoration(
              color: server.color,
              borderRadius: BorderRadius.circular(DiscordRadius.circle),
            ),
            child: Text(
              server.label,
              style: const TextStyle(
                color: DiscordColors.textPrimary,
                fontSize: 16,
                fontWeight: FontWeight.bold,
              ),
            ),
          ),
        ],
      ),
    );
  }
}
実行して確認すること
実行すると、1番上のサーバーアイコンの左に白いバーが表示されます。
▌ FL
  UI
  AI
これで、選択中のサーバーが分かるようになりました。
StatefulWidgetで選択状態を変える
今は、selectedIndex を固定で 0 にしています。
const selectedIndex = 0;
これでは、タップしても選択状態が変わりません。
タップで選択を変えるには、状態を持つ必要があります。
状態を持つときは、StatefulWidget を使います。
ServerRailPracticePage を StatefulWidget に変更します。
class ServerRailPracticePage extends StatefulWidget {
  const ServerRailPracticePage({super.key});

  @override
  State<ServerRailPracticePage> createState() => _ServerRailPracticePageState();
}

class _ServerRailPracticePageState extends State<ServerRailPracticePage> {
  int selectedIndex = 0;

  void selectServer(int index) {
    setState(() {
      selectedIndex = index;
    });
  }

  @override
  Widget build(BuildContext context) {
    return Scaffold(
      body: Row(
        children: [
          SizedBox(
            width: 72,
            child: ServerRail(
              selectedIndex: selectedIndex,
              onSelected: selectServer,
            ),
          ),
          Expanded(
            child: Center(
              child: Text(
                '選択中: ${servers[selectedIndex].name}',
                style: const TextStyle(
                  color: DiscordColors.textPrimary,
                  fontSize: 24,
                  fontWeight: FontWeight.bold,
                ),
              ),
            ),
          ),
        ],
      ),
    );
  }
}
ServerRail には、選択中番号と、選択されたときの処理を渡します。
ServerRail(
  selectedIndex: selectedIndex,
  onSelected: selectServer,
)
ServerRailでタップ処理を受け取る
ServerRail 側も変更します。
class ServerRail extends StatelessWidget {
  const ServerRail({
    super.key,
    required this.selectedIndex,
    required this.onSelected,
  });

  final int selectedIndex;
  final ValueChanged<int> onSelected;

  @override
  Widget build(BuildContext context) {
    return Container(
      color: DiscordColors.appRail,
      child: ListView.builder(
        padding: const EdgeInsets.symmetric(vertical: DiscordSpacing.md),
        itemCount: servers.length,
        itemBuilder: (context, index) {
          final server = servers[index];

          return ServerIcon(
            server: server,
            selected: selectedIndex == index,
            onTap: () => onSelected(index),
          );
        },
      ),
    );
  }
}
ここで新しく出てきたのが、ValueChanged<int> です。
初心者向けには、次のように理解してください。
ValueChanged<int>
↓
intの値を受け取る関数
今回の場合、タップされたサーバー番号を親に伝えるために使っています。
ServerIconをタップ
↓
onTap
↓
onSelected(index)
↓
親WidgetのselectedIndexが変わる
ServerIconにタップ処理を追加する
ServerIcon に onTap を追加します。
class ServerIcon extends StatelessWidget {
  const ServerIcon({
    super.key,
    required this.server,
    required this.selected,
    required this.onTap,
  });

  final DiscordServer server;
  final bool selected;
  final VoidCallback onTap;
}
VoidCallback は、引数なしで実行できる関数です。
初心者向けには、次のように理解してください。
VoidCallback
↓
押されたときに実行する処理
タップできるようにするには、GestureDetector を使います。
GestureDetector(
  onTap: onTap,
  child: ...
)
GestureDetector は、タップなどのユーザー操作を受け取るWidgetです。
タップで選択できるコード
ここまでを反映したコードです。
class ServerIcon extends StatelessWidget {
  const ServerIcon({
    super.key,
    required this.server,
    required this.selected,
    required this.onTap,
  });

  final DiscordServer server;
  final bool selected;
  final VoidCallback onTap;

  @override
  Widget build(BuildContext context) {
    return GestureDetector(
      onTap: onTap,
      child: SizedBox(
        height: 58,
        child: Stack(
          alignment: Alignment.center,
          children: [
            Positioned(
              left: 0,
              child: Container(
                width: 4,
                height: selected ? 40 : 0,
                decoration: const BoxDecoration(
                  color: DiscordColors.textPrimary,
                  borderRadius: BorderRadius.horizontal(
                    right: Radius.circular(999),
                  ),
                ),
              ),
            ),
            Container(
              width: 48,
              height: 48,
              alignment: Alignment.center,
              decoration: BoxDecoration(
                color: server.color,
                borderRadius: BorderRadius.circular(DiscordRadius.circle),
              ),
              child: Text(
                server.label,
                style: const TextStyle(
                  color: DiscordColors.textPrimary,
                  fontSize: 16,
                  fontWeight: FontWeight.bold,
                ),
              ),
            ),
          ],
        ),
      ),
    );
  }
}
これで、サーバーアイコンをタップすると、選択中サーバーが変わるようになります。
hover風アニメーションを作る
PC向けのDiscord風UIでは、マウスを重ねたときにアイコンの見た目が少し変わります。
Flutterでは、マウスが重なったかどうかを MouseRegion で受け取れます。
MouseRegion(
  onEnter: (_) {
    // マウスが入った
  },
  onExit: (_) {
    // マウスが出た
  },
  child: ...
)
hover状態を持つには、ServerIcon を StatefulWidget にします。
hovering = false
↓
通常

hovering = true
↓
マウスが乗っている
AnimatedContainerで形をなめらかに変える
アイコンの角丸をなめらかに変えるには、AnimatedContainer を使います。
AnimatedContainer は、色・サイズ・角丸などの変化をアニメーションしてくれるWidgetです。
AnimatedContainer(
  duration: const Duration(milliseconds: 170),
  width: 48,
  height: 48,
  decoration: BoxDecoration(
    borderRadius: BorderRadius.circular(active ? 16 : 999),
  ),
)
active が true のときは少し角丸の四角に近くします。
active が false のときは丸くします。
通常
↓
丸い

hoverまたは選択中
↓
少し角丸の四角に近づく
これがDiscordらしい動きになります。
hover対応したServerIcon
ServerIcon を次のように変更します。
class ServerIcon extends StatefulWidget {
  const ServerIcon({
    super.key,
    required this.server,
    required this.selected,
    required this.onTap,
  });

  final DiscordServer server;
  final bool selected;
  final VoidCallback onTap;

  @override
  State<ServerIcon> createState() => _ServerIconState();
}

class _ServerIconState extends State<ServerIcon> {
  bool hovering = false;

  @override
  Widget build(BuildContext context) {
    final active = widget.selected || hovering;

    return GestureDetector(
      onTap: widget.onTap,
      child: MouseRegion(
        onEnter: (_) {
          setState(() {
            hovering = true;
          });
        },
        onExit: (_) {
          setState(() {
            hovering = false;
          });
        },
        child: SizedBox(
          height: 58,
          child: Stack(
            alignment: Alignment.center,
            children: [
              AnimatedPositioned(
                duration: const Duration(milliseconds: 170),
                curve: Curves.easeOutCubic,
                left: 0,
                width: 4,
                height: widget.selected ? 40 : hovering ? 22 : 0,
                child: Container(
                  decoration: const BoxDecoration(
                    color: DiscordColors.textPrimary,
                    borderRadius: BorderRadius.horizontal(
                      right: Radius.circular(999),
                    ),
                  ),
                ),
              ),
              AnimatedContainer(
                duration: const Duration(milliseconds: 170),
                curve: Curves.easeOutCubic,
                width: 48,
                height: 48,
                alignment: Alignment.center,
                decoration: BoxDecoration(
                  color: widget.server.color,
                  borderRadius: BorderRadius.circular(active ? 16 : 999),
                ),
                child: Text(
                  widget.server.label,
                  style: const TextStyle(
                    color: DiscordColors.textPrimary,
                    fontSize: 16,
                    fontWeight: FontWeight.bold,
                  ),
                ),
              ),
            ],
          ),
        ),
      ),
    );
  }
}
AnimatedPositionedとは何か
選択中インジケーターには、AnimatedPositioned を使っています。
AnimatedPositioned(
  duration: const Duration(milliseconds: 170),
  left: 0,
  width: 4,
  height: widget.selected ? 40 : hovering ? 22 : 0,
  child: Container(...),
)
AnimatedPositioned は、Stack の中で位置やサイズの変化をアニメーションしてくれるWidgetです。
今回の場合、左の白いバーの高さをなめらかに変えています。
通常
↓
高さ0

hover
↓
高さ22

選択中
↓
高さ40
これで、Discordらしい選択・hoverの動きに近づきます。
サーバー画像URLを表示する
次に、サーバーアイコンを文字だけではなく、URL画像で表示できるようにします。
画像を表示するには、Image.network を使います。
Image.network(
  widget.server.imageUrl,
  fit: BoxFit.cover,
)
fit: BoxFit.cover は、画像を枠いっぱいに表示する指定です。
BoxFit.cover
↓
枠を埋めるように画像を拡大・切り取りする
サーバーアイコンの中に画像を入れる場合は、はみ出さないように clipBehavior を設定します。
AnimatedContainer(
  clipBehavior: Clip.antiAlias,
  decoration: BoxDecoration(...),
  child: Image.network(...),
)
画像がない場合はラベルを表示する
すべてのサーバーに画像URLがあるとは限りません。
そのため、画像URLが空なら、ラベルを表示するようにします。
final hasImage = widget.server.imageUrl.trim().isNotEmpty;
trim() は、前後の空白を取り除く処理です。
'   https://example.com  '
↓ trim()
'https://example.com'
画像がある場合は画像、ない場合は文字を表示します。
child: hasImage
    ? Image.network(...)
    : Text(widget.server.label)
画像読み込み失敗に対応する
URL画像は、読み込みに失敗することがあります。
たとえば、URLが間違っている場合や、通信できない場合です。
そのときにアプリが崩れないように、errorBuilder を使います。
Image.network(
  widget.server.imageUrl,
  fit: BoxFit.cover,
  errorBuilder: (context, error, stackTrace) {
    return Center(
      child: Text(widget.server.label),
    );
  },
)
初心者向けには、次のように理解してください。
errorBuilder
↓
画像が読み込めなかったときに代わりに表示するWidget
今回は、画像が失敗したらラベル表示に戻します。
画像対応したServerIcon
ServerIcon のアイコン部分を、次のように変更します。
AnimatedContainer(
  duration: const Duration(milliseconds: 170),
  curve: Curves.easeOutCubic,
  width: 48,
  height: 48,
  clipBehavior: Clip.antiAlias,
  decoration: BoxDecoration(
    color: widget.server.color,
    borderRadius: BorderRadius.circular(active ? 16 : 999),
  ),
  child: widget.server.imageUrl.trim().isEmpty
      ? Center(
          child: FittedBox(
            fit: BoxFit.scaleDown,
            child: Text(
              widget.server.label,
              maxLines: 1,
              style: const TextStyle(
                color: DiscordColors.textPrimary,
                fontSize: 16,
                fontWeight: FontWeight.bold,
              ),
            ),
          ),
        )
      : Image.network(
          widget.server.imageUrl,
          fit: BoxFit.cover,
          errorBuilder: (context, error, stackTrace) {
            return Center(
              child: FittedBox(
                fit: BoxFit.scaleDown,
                child: Text(
                  widget.server.label,
                  maxLines: 1,
                  style: const TextStyle(
                    color: DiscordColors.textPrimary,
                    fontSize: 16,
                    fontWeight: FontWeight.bold,
                  ),
                ),
              ),
            );
          },
        ),
)
ここで FittedBox も使っています。
FittedBox は、中の文字を枠に収まるように調整してくれます。
ラベルが長い
↓
FittedBoxで縮小して収める
Tooltipを追加する
Discordでは、サーバーアイコンにマウスを重ねると、サーバー名が表示されます。
Flutterでは Tooltip を使うと、簡単に説明ラベルを表示できます。
Tooltip(
  message: widget.server.name,
  child: GestureDetector(
    onTap: widget.onTap,
    child: ...
  ),
)
初心者向けには、次のように理解してください。
Tooltip
↓
マウスを重ねたときに説明を表示するWidget
サーバーアイコンは小さいので、名前が分かるように Tooltip をつけると便利です。
ここまでの完成コード
ここまでの内容をまとめたコードです。
import 'package:flutter/material.dart';

void main() {
  runApp(const ServerRailPracticeApp());
}

class ServerRailPracticeApp extends StatelessWidget {
  const ServerRailPracticeApp({super.key});

  @override
  Widget build(BuildContext context) {
    return MaterialApp(
      title: 'Server Rail Practice',
      debugShowCheckedModeBanner: false,
      theme: ThemeData(
        brightness: Brightness.dark,
        scaffoldBackgroundColor: DiscordColors.background,
      ),
      home: const ServerRailPracticePage(),
    );
  }
}

class DiscordColors {
  static const Color appRail = Color(0xFF1E1F22);
  static const Color background = Color(0xFF313338);
  static const Color textPrimary = Color(0xFFF2F3F5);
  static const Color blurple = Color(0xFF5865F2);
  static const Color green = Color(0xFF23A559);
}

class DiscordSpacing {
  static const double md = 12;
}

class DiscordRadius {
  static const double circle = 999;
}

class DiscordServer {
  const DiscordServer({
    required this.name,
    required this.label,
    required this.imageUrl,
    required this.color,
  });

  final String name;
  final String label;
  final String imageUrl;
  final Color color;
}

const servers = [
  DiscordServer(
    name: 'Flutter Lab',
    label: 'FL',
    imageUrl:
        'https://images.unsplash.com/photo-1555066931-4365d14bab8c?w=200&h=200&fit=crop',
    color: DiscordColors.blurple,
  ),
  DiscordServer(
    name: 'Design Hub',
    label: 'UI',
    imageUrl:
        'https://images.unsplash.com/photo-1561070791-2526d30994b5?w=200&h=200&fit=crop',
    color: Color(0xFFEB459E),
  ),
  DiscordServer(
    name: 'AI Studio',
    label: 'AI',
    imageUrl:
        'https://images.unsplash.com/photo-1677442136019-21780ecad995?w=200&h=200&fit=crop',
    color: DiscordColors.green,
  ),
  DiscordServer(
    name: 'Study Room',
    label: 'ST',
    imageUrl: '',
    color: Color(0xFFF0B232),
  ),
];

class ServerRailPracticePage extends StatefulWidget {
  const ServerRailPracticePage({super.key});

  @override
  State<ServerRailPracticePage> createState() => _ServerRailPracticePageState();
}

class _ServerRailPracticePageState extends State<ServerRailPracticePage> {
  int selectedIndex = 0;

  void selectServer(int index) {
    setState(() {
      selectedIndex = index;
    });
  }

  @override
  Widget build(BuildContext context) {
    return Scaffold(
      body: Row(
        children: [
          SizedBox(
            width: 72,
            child: ServerRail(
              selectedIndex: selectedIndex,
              onSelected: selectServer,
            ),
          ),
          Expanded(
            child: Center(
              child: Text(
                '選択中: ${servers[selectedIndex].name}',
                style: const TextStyle(
                  color: DiscordColors.textPrimary,
                  fontSize: 24,
                  fontWeight: FontWeight.bold,
                ),
              ),
            ),
          ),
        ],
      ),
    );
  }
}

class ServerRail extends StatelessWidget {
  const ServerRail({
    super.key,
    required this.selectedIndex,
    required this.onSelected,
  });

  final int selectedIndex;
  final ValueChanged<int> onSelected;

  @override
  Widget build(BuildContext context) {
    return Container(
      color: DiscordColors.appRail,
      child: Column(
        children: [
          Expanded(
            child: ListView.builder(
              padding: const EdgeInsets.symmetric(
                vertical: DiscordSpacing.md,
              ),
              itemCount: servers.length,
              itemBuilder: (context, index) {
                final server = servers[index];

                return ServerIcon(
                  server: server,
                  selected: selectedIndex == index,
                  onTap: () => onSelected(index),
                );
              },
            ),
          ),
          ServerIcon(
            server: const DiscordServer(
              name: 'Add Server',
              label: '+',
              imageUrl: '',
              color: DiscordColors.green,
            ),
            selected: false,
            onTap: () {},
          ),
          const SizedBox(height: DiscordSpacing.md),
        ],
      ),
    );
  }
}

class ServerIcon extends StatefulWidget {
  const ServerIcon({
    super.key,
    required this.server,
    required this.selected,
    required this.onTap,
  });

  final DiscordServer server;
  final bool selected;
  final VoidCallback onTap;

  @override
  State<ServerIcon> createState() => _ServerIconState();
}

class _ServerIconState extends State<ServerIcon> {
  bool hovering = false;

  @override
  Widget build(BuildContext context) {
    final active = widget.selected || hovering;

    return Tooltip(
      message: widget.server.name,
      child: GestureDetector(
        onTap: widget.onTap,
        child: MouseRegion(
          onEnter: (_) {
            setState(() {
              hovering = true;
            });
          },
          onExit: (_) {
            setState(() {
              hovering = false;
            });
          },
          child: SizedBox(
            height: 58,
            child: Stack(
              alignment: Alignment.center,
              children: [
                AnimatedPositioned(
                  duration: const Duration(milliseconds: 170),
                  curve: Curves.easeOutCubic,
                  left: 0,
                  width: 4,
                  height: widget.selected ? 40 : hovering ? 22 : 0,
                  child: Container(
                    decoration: const BoxDecoration(
                      color: DiscordColors.textPrimary,
                      borderRadius: BorderRadius.horizontal(
                        right: Radius.circular(999),
                      ),
                    ),
                  ),
                ),
                AnimatedContainer(
                  duration: const Duration(milliseconds: 170),
                  curve: Curves.easeOutCubic,
                  width: 48,
                  height: 48,
                  clipBehavior: Clip.antiAlias,
                  decoration: BoxDecoration(
                    color: widget.server.color,
                    borderRadius: BorderRadius.circular(active ? 16 : 999),
                  ),
                  child: widget.server.imageUrl.trim().isEmpty
                      ? Center(
                          child: FittedBox(
                            fit: BoxFit.scaleDown,
                            child: Text(
                              widget.server.label,
                              maxLines: 1,
                              style: const TextStyle(
                                color: DiscordColors.textPrimary,
                                fontSize: 16,
                                fontWeight: FontWeight.bold,
                              ),
                            ),
                          ),
                        )
                      : Image.network(
                          widget.server.imageUrl,
                          fit: BoxFit.cover,
                          errorBuilder: (context, error, stackTrace) {
                            return Center(
                              child: FittedBox(
                                fit: BoxFit.scaleDown,
                                child: Text(
                                  widget.server.label,
                                  maxLines: 1,
                                  style: const TextStyle(
                                    color: DiscordColors.textPrimary,
                                    fontSize: 16,
                                    fontWeight: FontWeight.bold,
                                  ),
                                ),
                              ),
                            );
                          },
                        ),
                ),
              ],
            ),
          ),
        ),
      ),
    );
  }
}
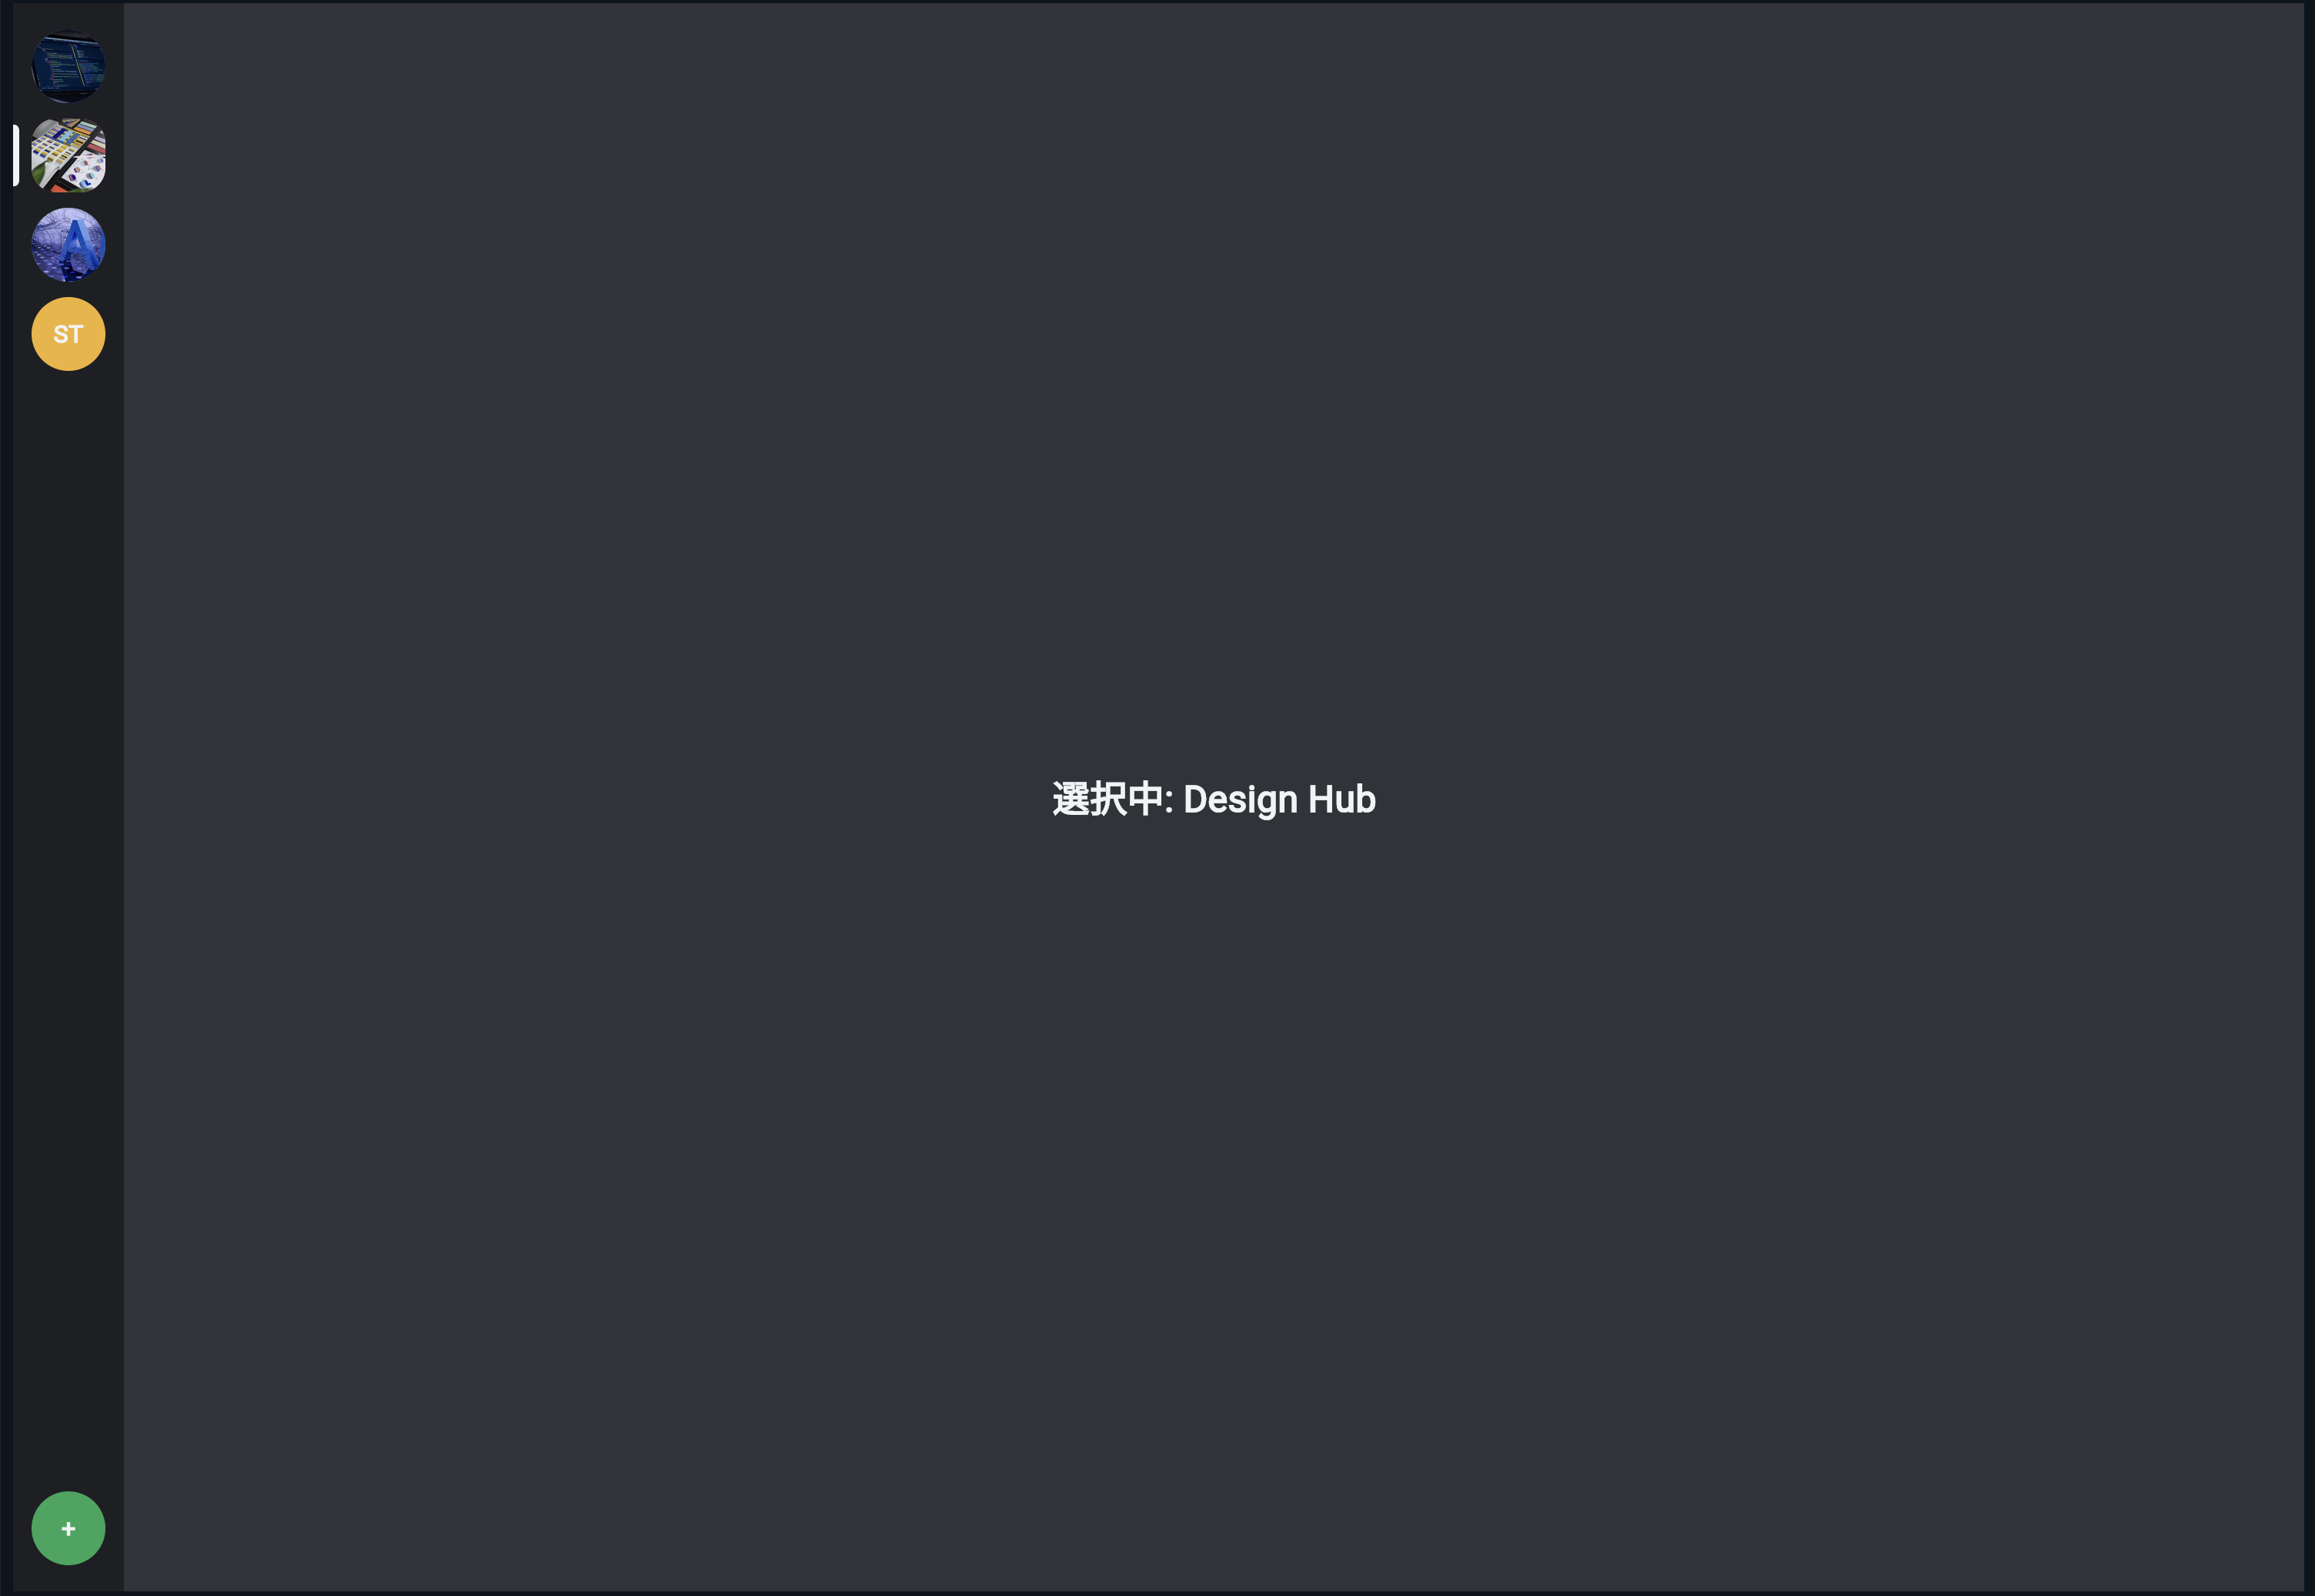
実行して確認すること
このコードを実行すると、左端にDiscord風のサーバー一覧が表示されます。
確認するポイントは、次の通りです。
サーバーアイコンが縦に並んでいる
画像URLがあるものは画像で表示される
画像URLが空のものはラベルで表示される
選択中サーバーの左に白いバーが出る
タップすると選択中サーバーが変わる
マウスを重ねると角丸とインジケーターが変化する
この時点で、Discord風UIの特徴的な左端バーにかなり近づきます。
親Widgetと子Widgetの関係を整理する
今回のコードでは、親Widgetが選択状態を持っています。
int selectedIndex = 0;
そして、その状態を子Widgetに渡しています。
ServerRail(
  selectedIndex: selectedIndex,
  onSelected: selectServer,
)
ServerRail は、さらに ServerIcon に渡します。
ServerIcon(
  server: server,
  selected: selectedIndex == index,
  onTap: () => onSelected(index),
)
流れは次の通りです。
ServerRailPracticePage
↓
selectedIndexを持つ
↓
ServerRailに渡す
↓
ServerIconにselectedとして渡す
↓
見た目が変わる
ユーザーがタップしたときは、逆向きに処理が伝わります。
ServerIconをタップ
↓
onTap
↓
onSelected(index)
↓
selectServer(index)
↓
setState
↓
画面更新
この流れは、Flutterの状態管理の基本です。
手を動かす練習1:サーバーを追加する
servers に、次のサーバーを追加してみましょう。
DiscordServer(
  name: 'Game Room',
  label: 'GM',
  imageUrl:
      'https://images.unsplash.com/photo-1511512578047-dfb367046420?w=200&h=200&fit=crop',
  color: Color(0xFF9B59FF),
),
保存すると、左端にサーバーアイコンが1つ増えます。
この練習で、データを追加するとUIも増えることを確認できます。
手を動かす練習2:選択中の角丸を変える
次の部分を探してください。
borderRadius: BorderRadius.circular(active ? 16 : 999),
16 を 12 に変えてみます。
borderRadius: BorderRadius.circular(active ? 12 : 999),
hover時や選択中の角丸が少し変わります。
このように、数値を変えるだけでUIの印象が変わります。
手を動かす練習3:インジケーターの高さを変える
次の部分を探してください。
height: widget.selected ? 40 : hovering ? 22 : 0,
40 を 34 に変えてみます。
height: widget.selected ? 34 : hovering ? 22 : 0,
選択中インジケーターが少し短くなります。
Discordらしさを保つには、サーバーアイコンより少し短いくらいが自然です。
手を動かす練習4:画像URLを空にしてみる
Flutter Lab の imageUrl を空にしてみましょう。
imageUrl: '',
すると、画像ではなく FL というラベルが表示されます。
この練習で、画像がない場合の代替表示を確認できます。
手を動かす練習5:壊れたURLを入れてみる
imageUrl に、存在しないURLを入れてみます。
imageUrl: 'https://example.com/not-found-image.jpg',
画像が読み込めない場合、errorBuilder によってラベル表示に戻ります。
アプリを安全に作るには、このような失敗時の表示も大切です。
よくあるつまずき1:画像が表示されない
Image.network は、インターネット上の画像を読み込みます。
画像が表示されない場合は、次の可能性があります。
URLが間違っている
ネットワークに接続できていない
画像提供元が読み込みを拒否している
DartPadや実行環境の制限がある
そのため、errorBuilder を用意しておくと安全です。
errorBuilder: (context, error, stackTrace) {
  return Text(widget.server.label);
}
よくあるつまずき2:Stackの中で位置が分からない
Stack は重ねるWidgetです。
今回の Stack では、左のインジケーターと中央のアイコンを重ねています。
Stack
├─ AnimatedPositioned:左インジケーター
└─ AnimatedContainer:中央アイコン
Positioned(left: 0) によって、インジケーターを左端に置いています。
AnimatedPositioned(
  left: 0,
  ...
)
よくあるつまずき3:hoverがスマホで分からない
MouseRegion のhoverは、主にPCでマウスを使う場合に分かりやすい機能です。
スマホにはマウスがないため、hoverの変化は基本的に確認できません。
PC
↓
hoverが分かる

スマホ
↓
タップ操作が中心
スマホでは、選択中の見た目が重要になります。
よくあるつまずき4:setStateをどこで使うか分からない
今回、setState は親Widgetで使っています。
class _ServerRailPracticePageState extends State<ServerRailPracticePage> {
  int selectedIndex = 0;

  void selectServer(int index) {
    setState(() {
      selectedIndex = index;
    });
  }
}
なぜなら、選択中サーバーの状態は、画面全体に関係するからです。
selectedIndex
↓
サーバーアイコンの選択表示
↓
中央の「選択中」テキスト
状態は、それを必要とするWidgetたちの共通の親に置くと分かりやすいです。
この節の確認問題
確認問題1
ServerRail は何を担当するWidgetですか。
答え
左端のサーバー一覧全体を担当するWidgetです。
確認問題2
ServerIcon は何を担当するWidgetですか。
答え
サーバーアイコン1つ分の表示を担当するWidgetです。
確認問題3
サーバー1つ分のデータを表すclass名は何でしたか。
答え
DiscordServer です。
確認問題4
複数のサーバーを縦に並べるために使ったWidgetは何ですか。
答え
ListView.builder です。
確認問題5
サーバーアイコンにマウスを重ねたときの状態を受け取るWidgetは何ですか。
答え
MouseRegion です。
確認問題6
サーバーアイコンの角丸をなめらかに変えるために使ったWidgetは何ですか。
答え
AnimatedContainer です。
確認問題7
画像が読み込めなかったときに代わりの表示を出すために使うものは何ですか。
答え
Image.network の errorBuilder です。
この節のまとめ
この節では、Discord風アプリの左端にあるサーバー一覧UIを作りました。
作った主な部品は、次の2つです。
ServerRail
ServerIcon
また、サーバー1つ分のデータとして DiscordServer classを作りました。
DiscordServer
├─ name
├─ label
├─ imageUrl
└─ color
今回学んだ重要な流れは、次の通りです。
サーバーデータをListで持つ
↓
ListView.builderで縦に並べる
↓
ServerIconに1つずつ渡す
↓
選択中かどうかで見た目を変える
↓
タップされたらsetStateで状態を更新する
この節で一番大切なのは、次の考え方です。
一覧UIは、1件分のデータと1件分のWidgetを作り、それをListView.builderで繰り返すと作りやすい。
次の節では、サーバー一覧の右側に表示される、Discord風のチャンネル一覧UIを作っていきます。